
· 9 min read

Every one is talking about Account Abstraction proposed by ERC-4337 and developers trying to find a way to adopt it. Some concepts you might have heard about are Smart Contract Wallets, EntryPoint contract, UserOperation, Paymasters, Bundlers etc. but few understand these concepts in detail.

The target audience for this article is developers who are familiar with the concept of account abstraction and have basic knowledge of concepts mentioned above but they don’t understand the detailed working of smart contracts related to it.

In this article we’ll try to understand EntryPoint contract line by line and try to visualise the transaction flow via EntryPoint contract and we’ll also learn how to initialise values in a UserOperation on the client side.

tip

If you have no knowledge of Account Abstraction but have some knowledge of smart contracts, I would recommend you read this article to understand it.

Basic Definitions

Before going deep into transaction flow, let’s first understand the basic definitions of terms we’ll use in this article.

UserOperation

Data structure that describes a transaction to be sent on behalf of a user. It is not an actual Blockchain transaction but is similar to it as it contains fields like sender, to, calldata, nonce, signature,maxFeePerGas, maxPriorityFeePerGas and more. We’ll go through them one by one.

EntryPoint

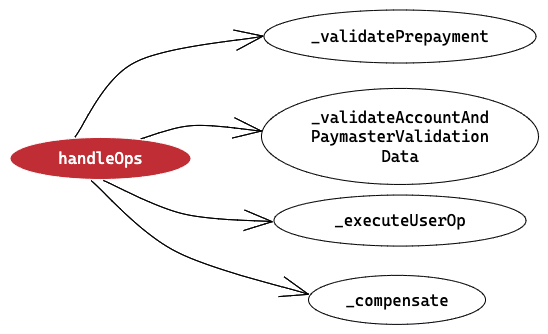
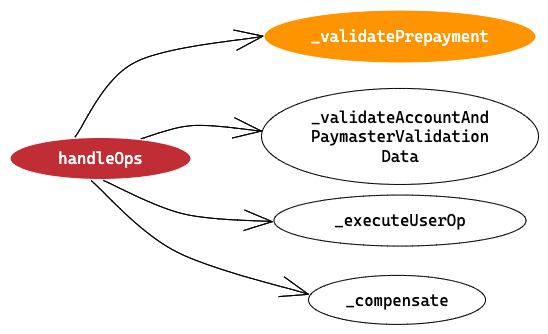
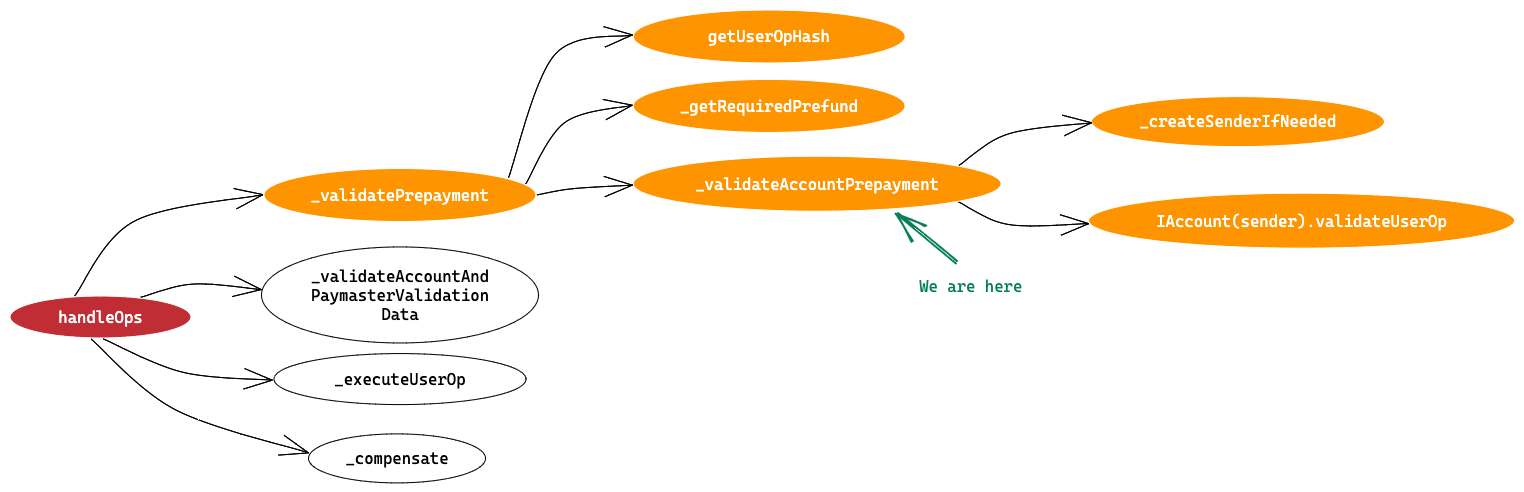
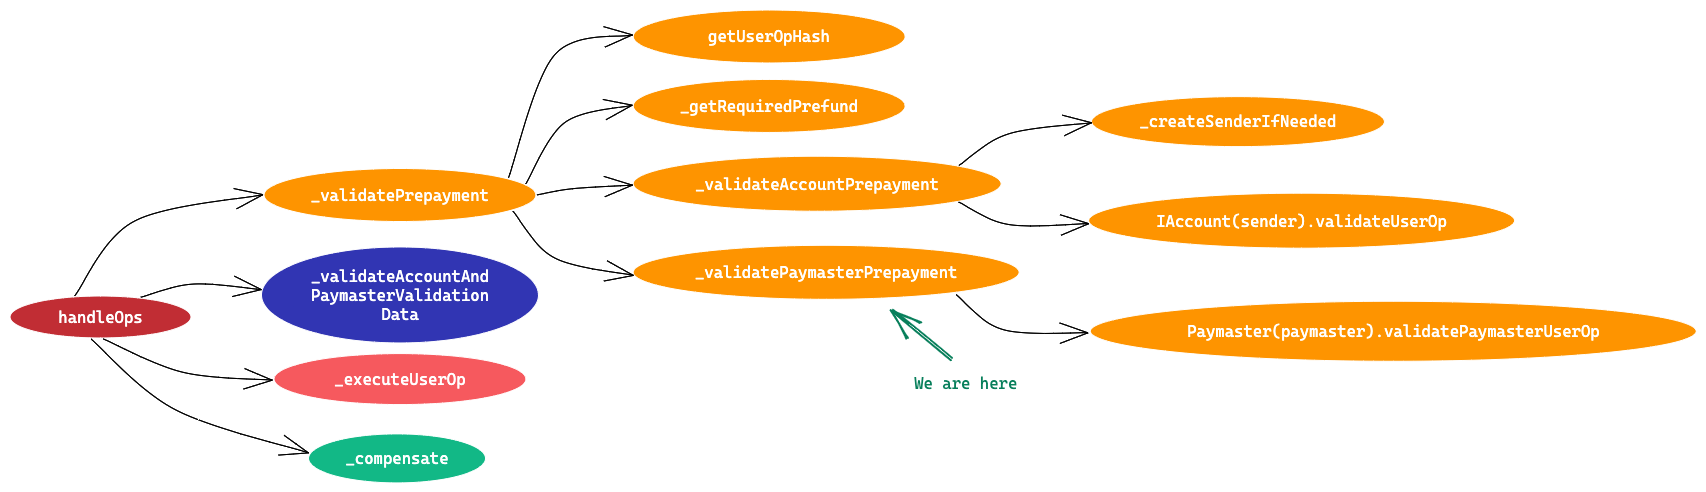
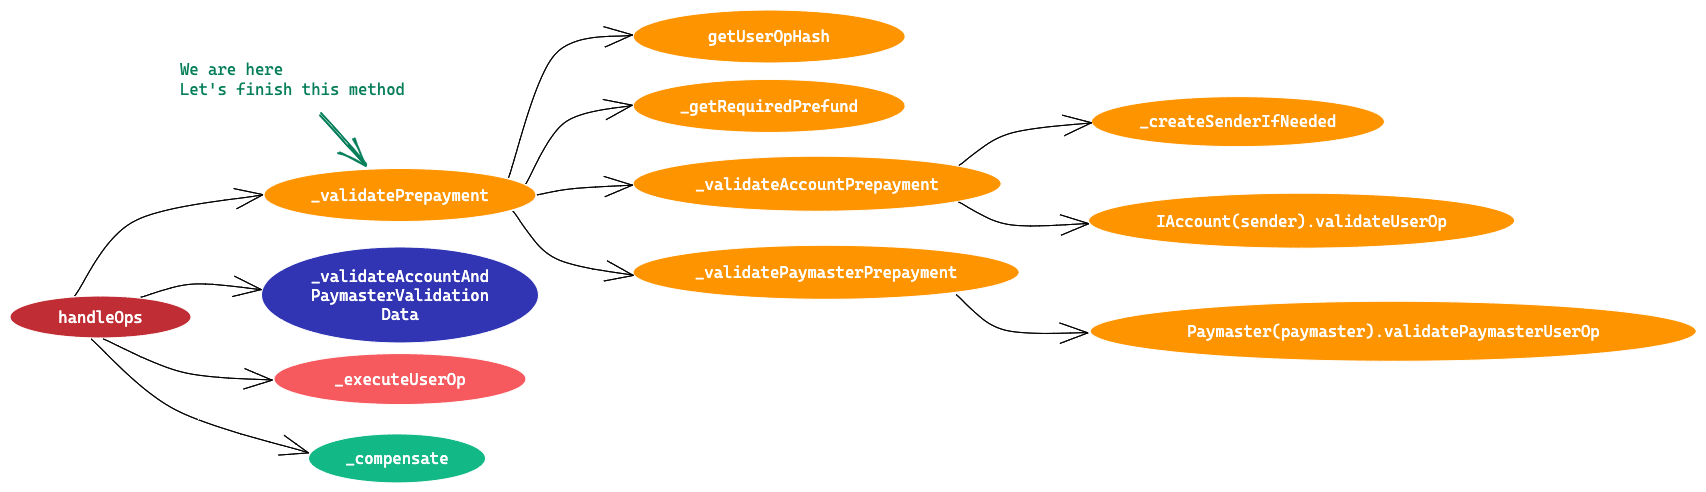
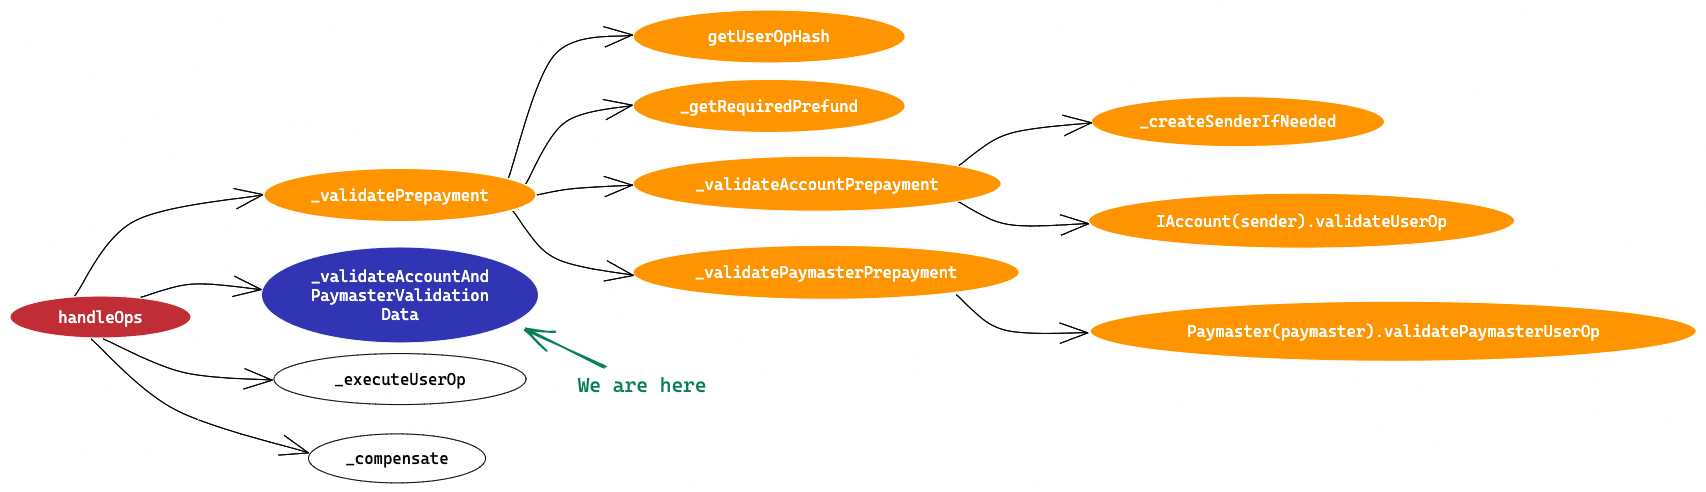
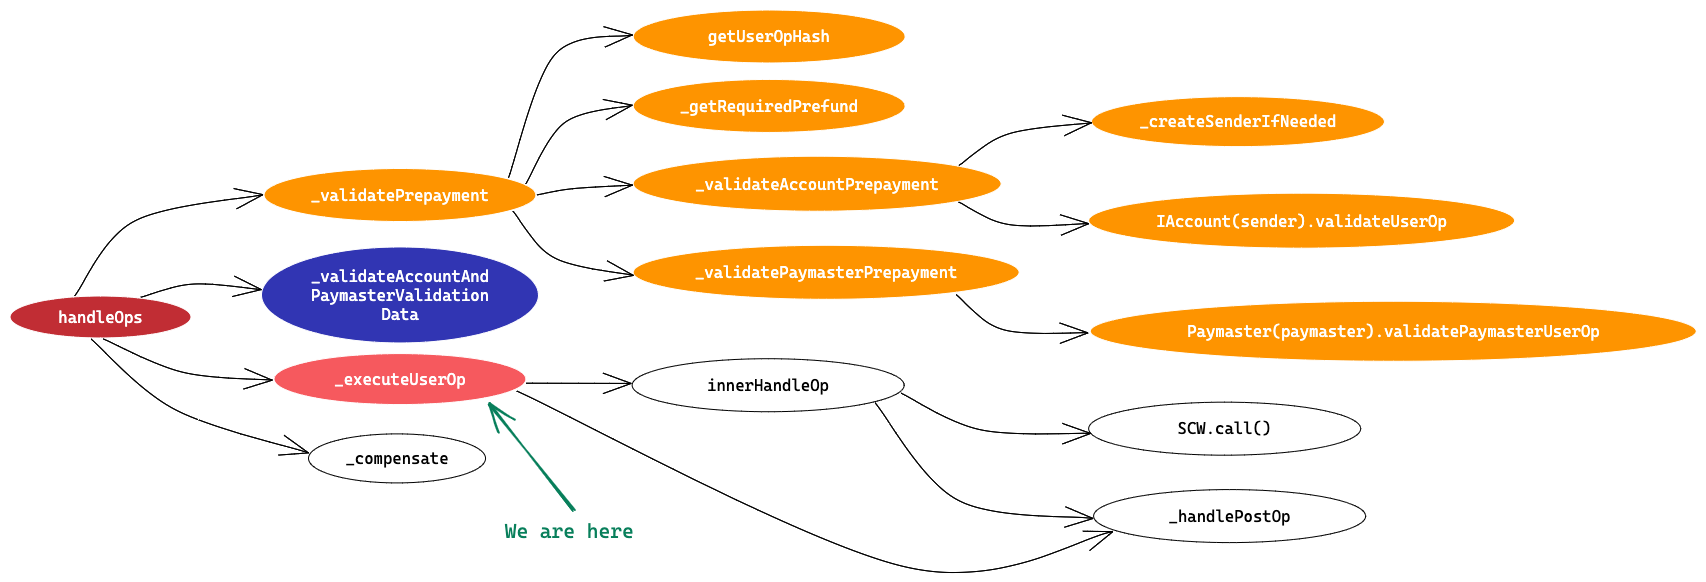
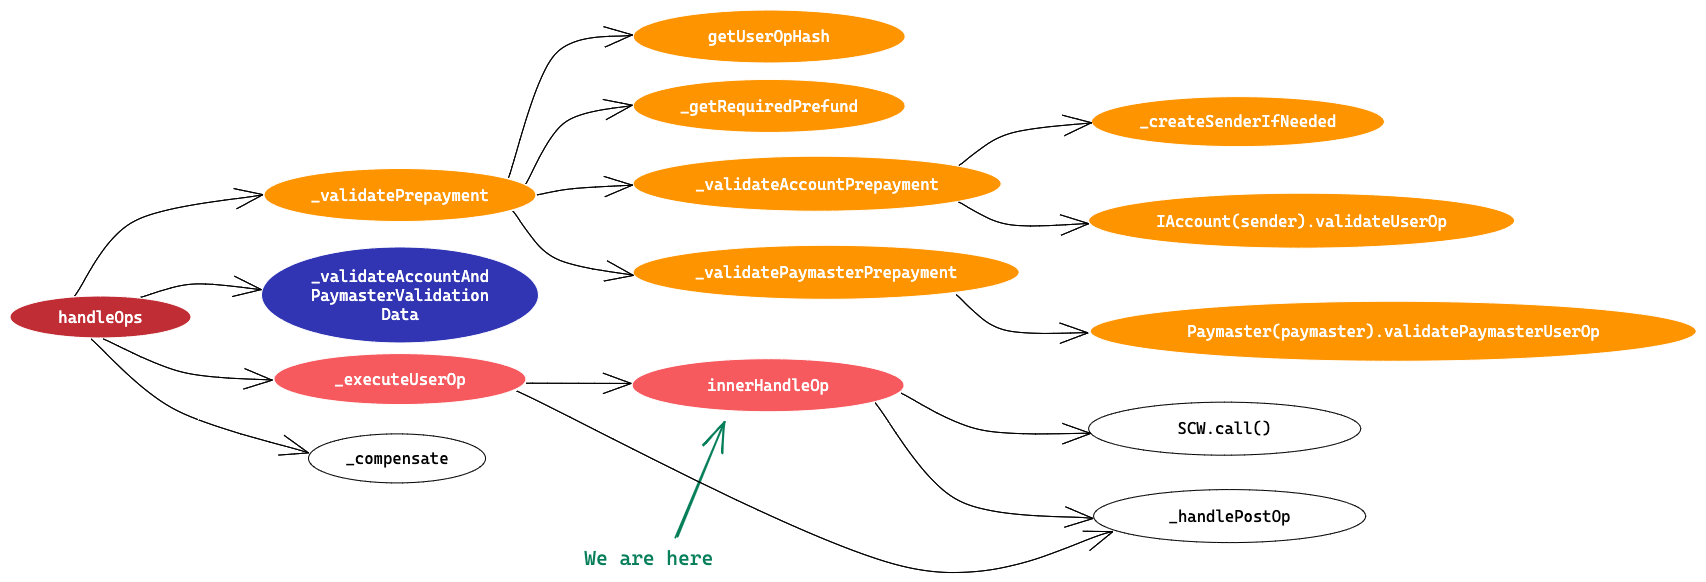
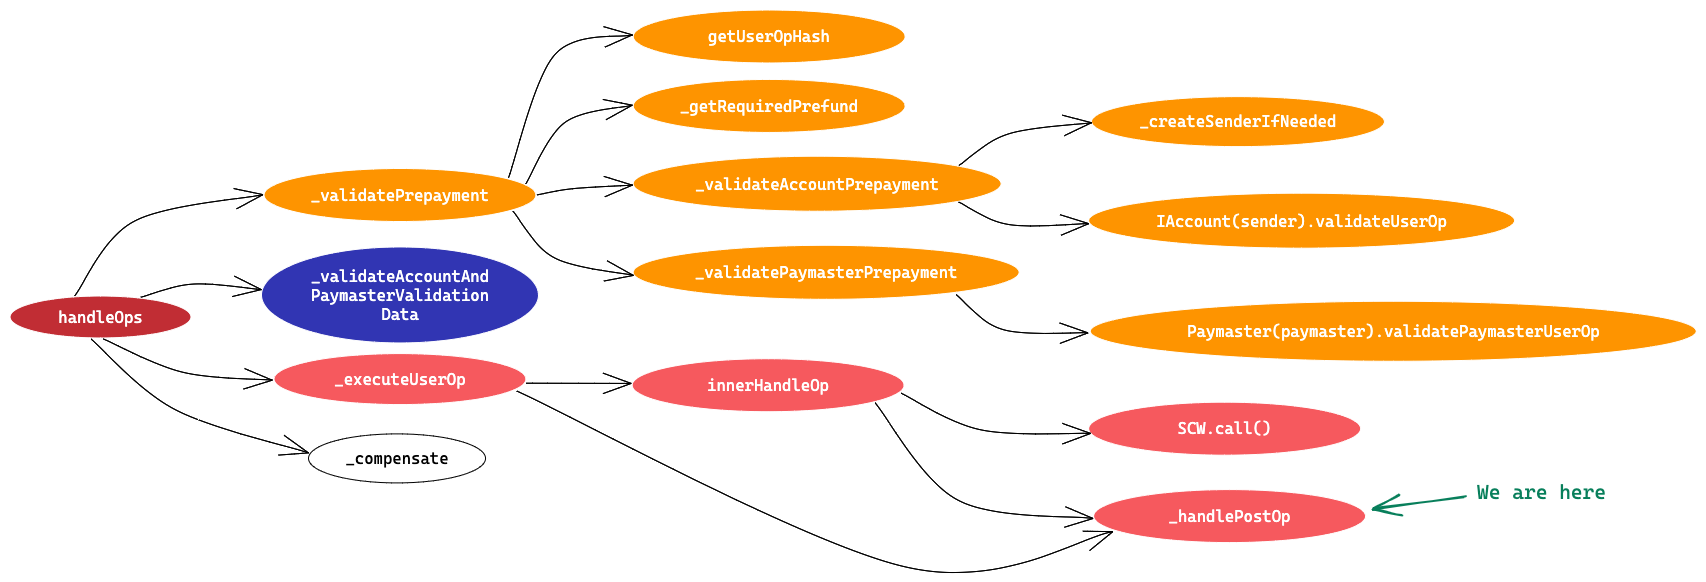
It is a singleton contract that’s used as an entry point to execute bundles of UserOperations. It has two entry point methods handleOps and handleAggregatedOps . We’ll go through only the handleOps method and its flow in this article. We’ll cover handleAggregatedOps in the next article.

Smart Account

It is a smart contract that acts as a user wallet where all user assets are stored. You can program it to validate transactions sent via SA before executing them. That’s why these are sometimes referred to as programmable accounts.

Paymaster

It is a smart contract that acts as a gas tank and is used to sponsor transactions where a third party pays the transaction fee on behalf of the user. The sponsor stores the gas beforehand using Paymaster which then can be used during the transaction flow via EntryPoint.

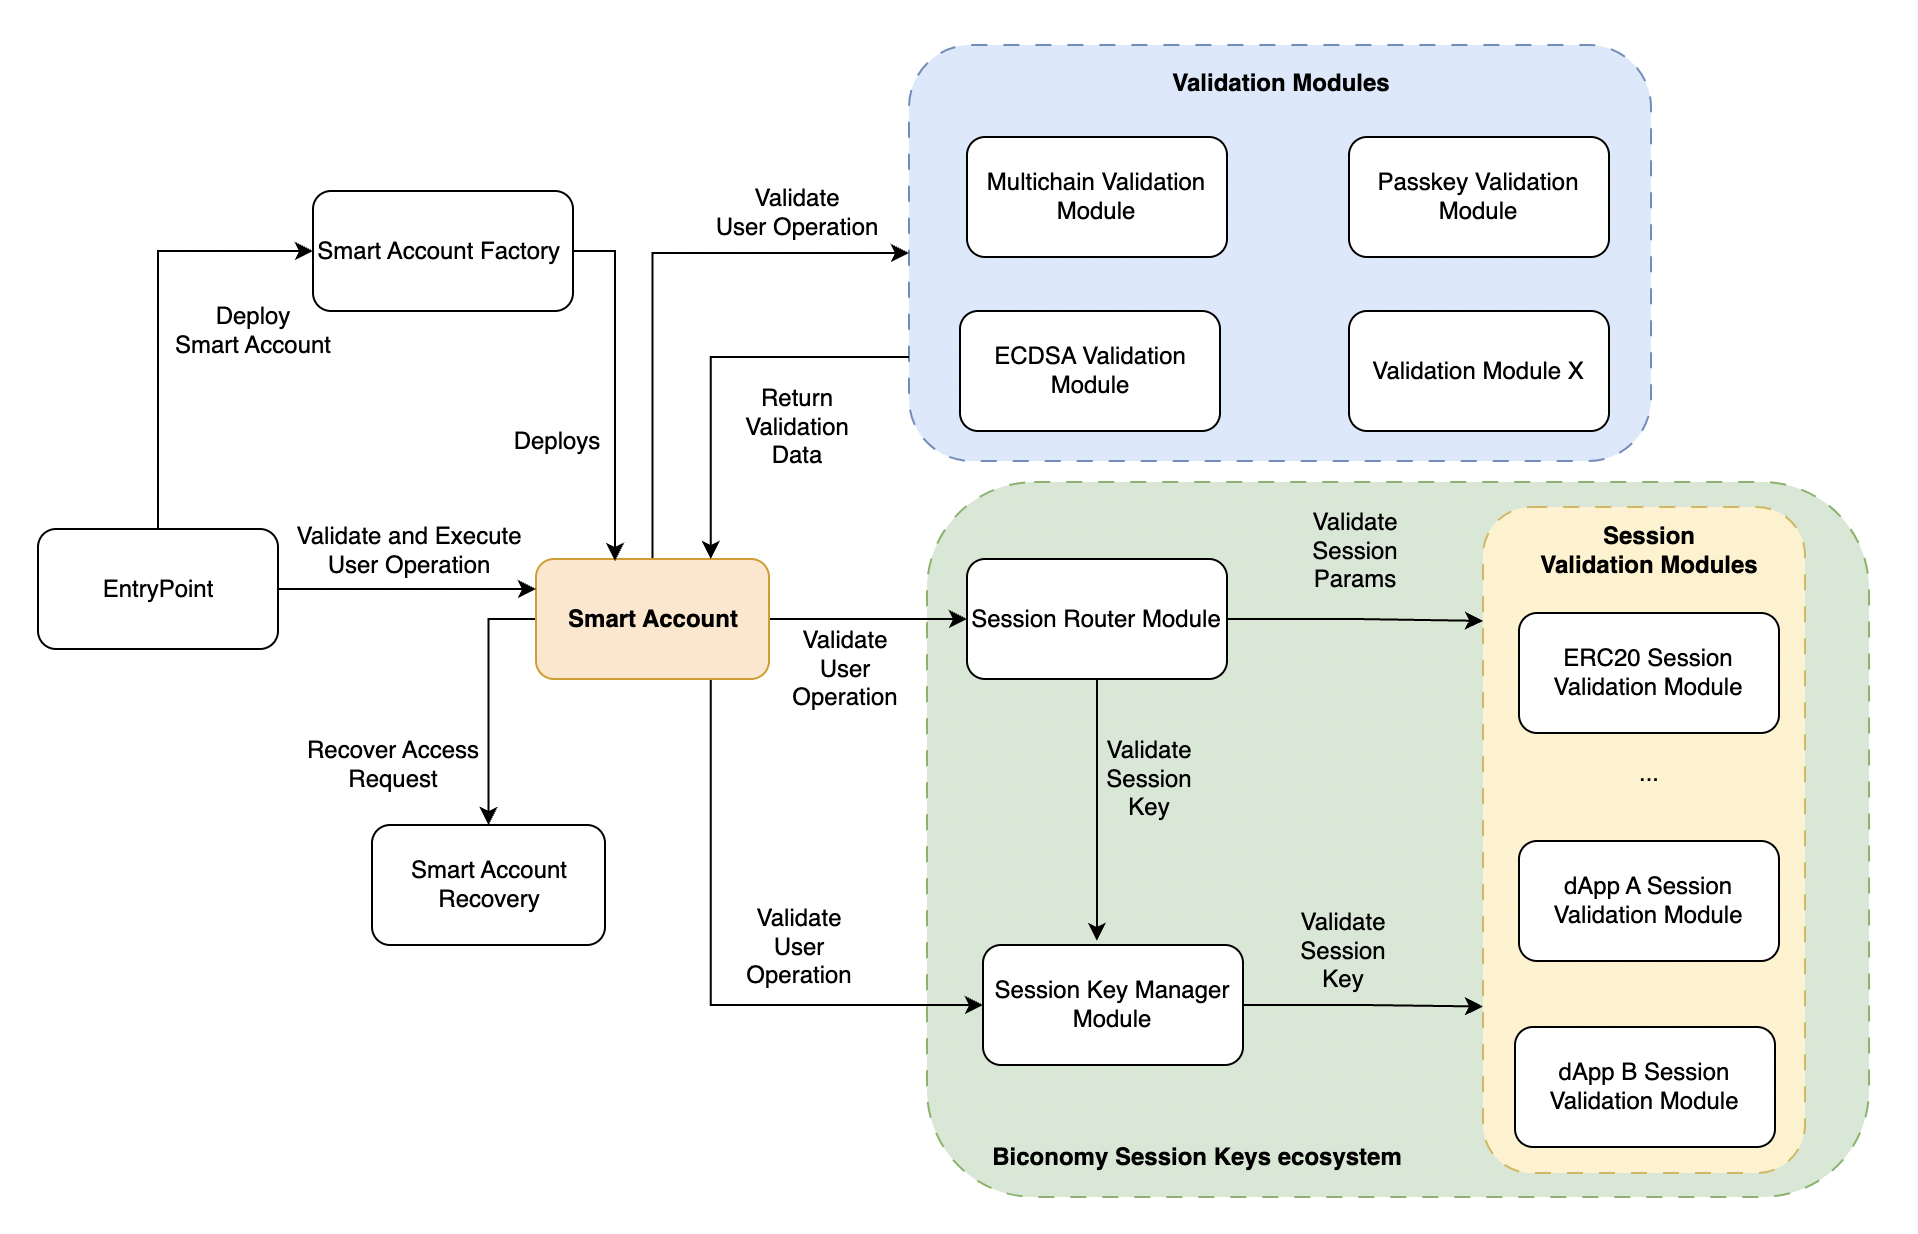
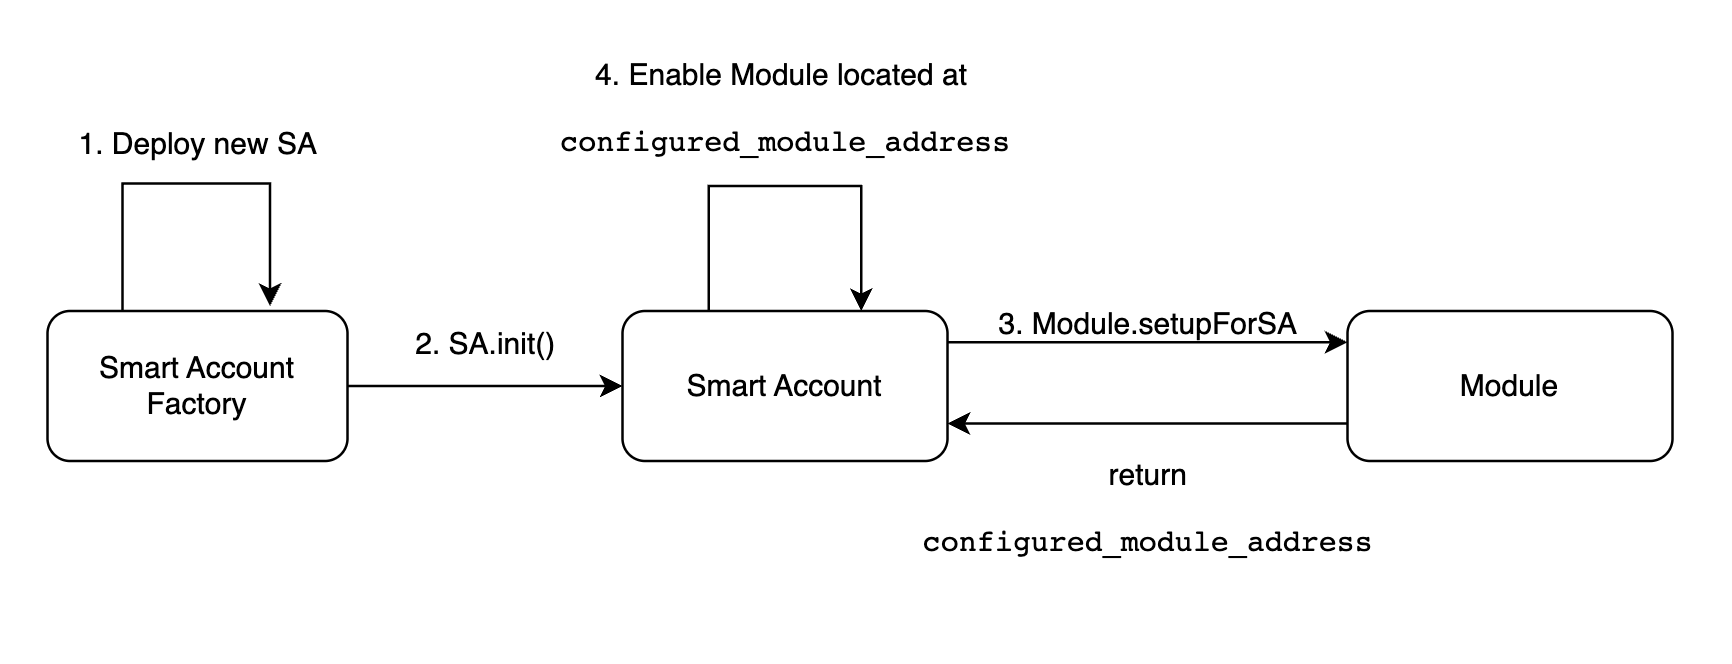
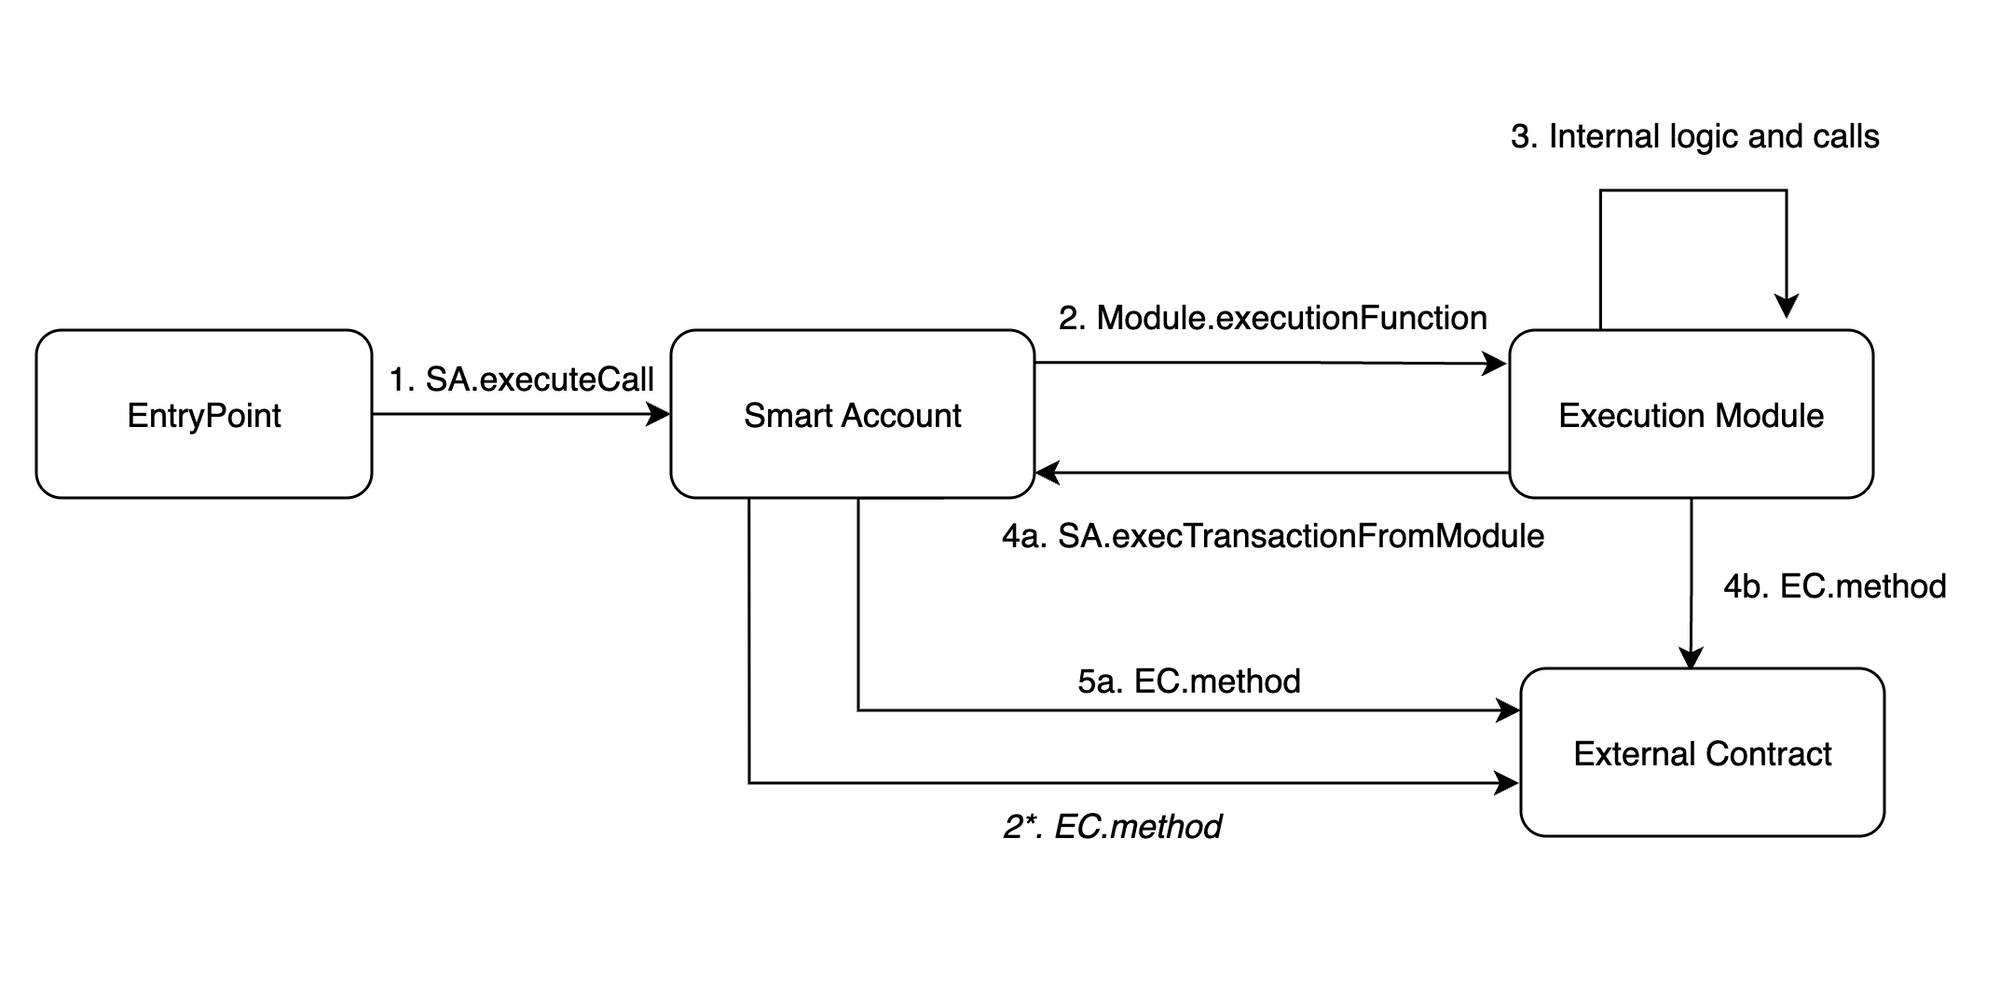
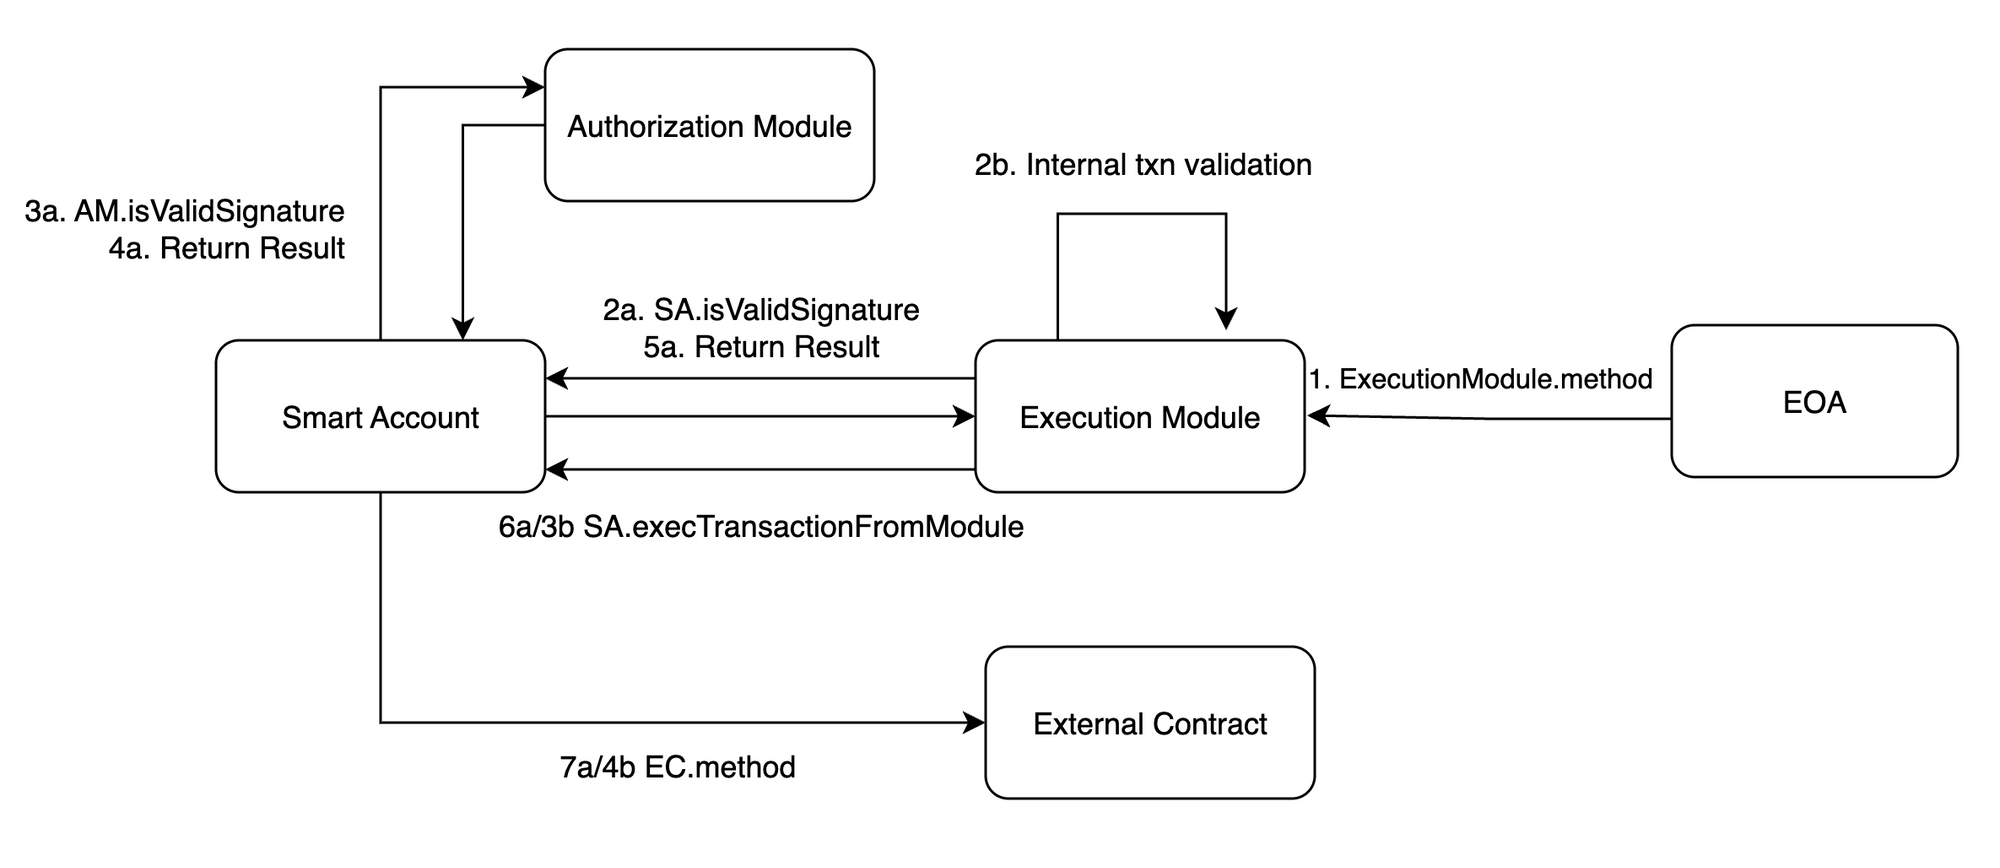
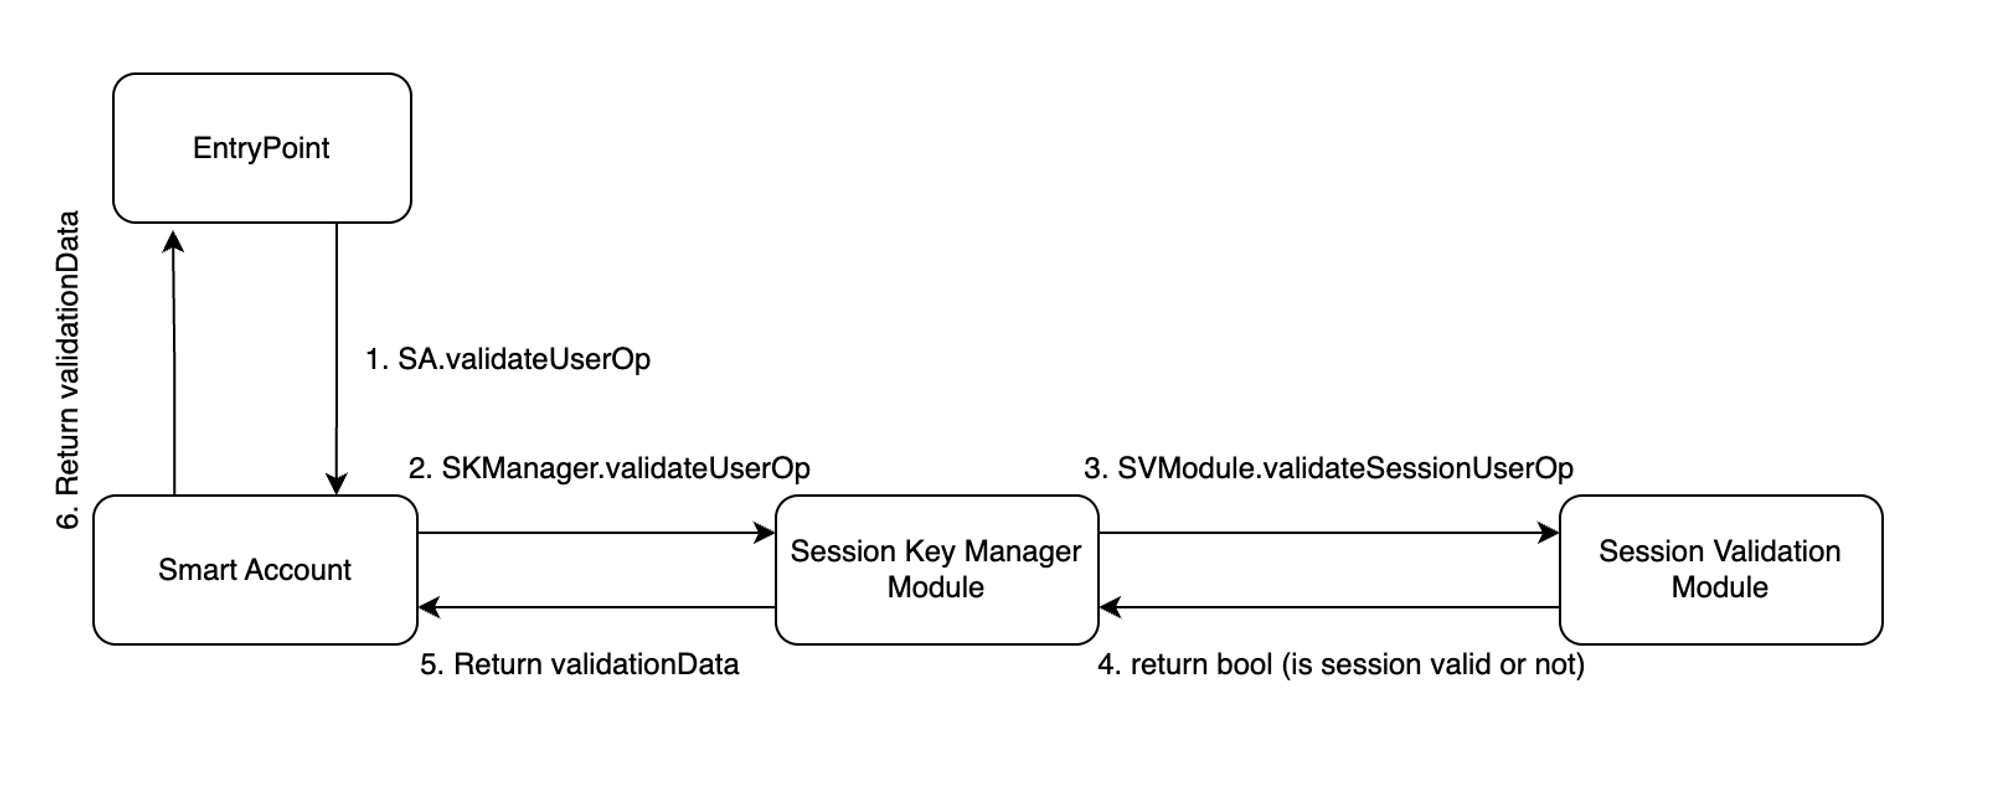
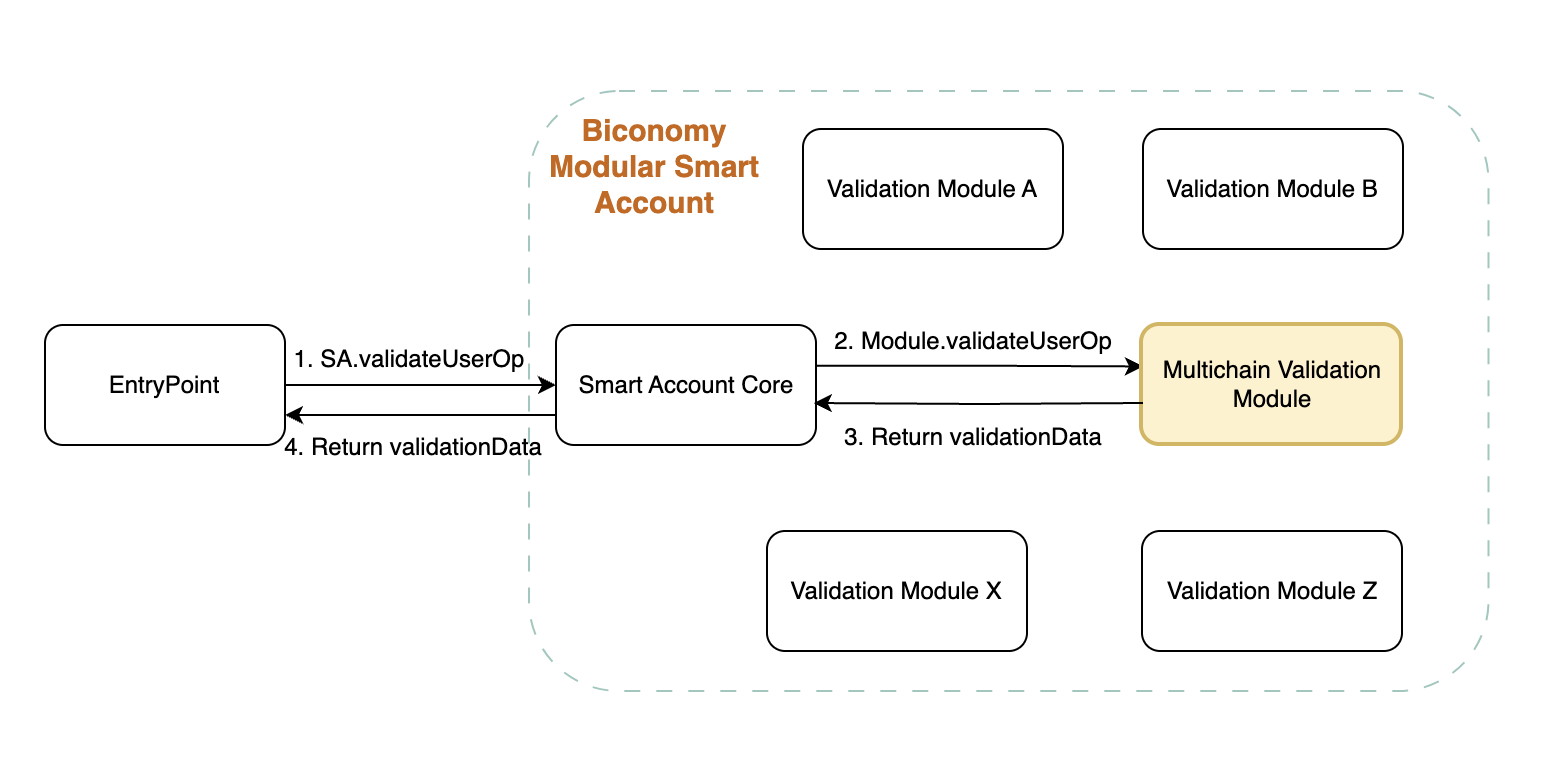
Here we have visualised a basic, high level account abstraction transaction flow.

AAFlow

tip

Code Reference: View on Github

Referenced Version

0.6.0

Data Structures used in EntryPoint

In EntryPoint contract, there are mainly three data structures that are used which are UserOperation, UserOpinfo, MemoryUserOP Only UserOperation is passed from outside to EP and other structs are created and used internally only for gas optimisation and information passing purpose.


struct UserOperation {
address sender;
uint256 nonce;
bytes initCode;
bytes callData;
uint256 callGasLimit;
uint256 verificationGasLimit;
uint256 preVerificationGas;
uint256 maxFeePerGas;
uint256 maxPriorityFeePerGas;
bytes paymasterAndData;
bytes signature;
}


struct UserOpInfo {
MemoryUserOp mUserOp;
bytes32 userOpHash;
uint256 prefund;
uint256 contextOffset;
uint256 preOpGas;
}


struct MemoryUserOp {
address sender;
uint256 nonce;
uint256 callGasLimit;
uint256 verificationGasLimit;
uint256 preVerificationGas;
address paymaster;
uint256 maxFeePerGas;
uint256 maxPriorityFeePerGas;
}

Let’s understand these struct and their fields in detail.

User Operation

Lets start with UserOperation and understand each field

FieldDescription
address senderSmart Contract Wallet address
uint256 nonceNonce value verified in EntryPoint to avoid replay attacks. SCW is not expected to implement this replay prevention mechanism.
bytes initCodeBytes containing calldata for SCW Factory contract. First 20 bytes are Factory contract address and rest is calldata of function to be called on Factory Contract.
bytes callDataCalldata of function to be executed on SCW. It can be any function on SCW (e.g. execute or executeBatch) which usually then further calls a dApp smart contract. It can even call other methods of SCW internally as well. It's upto you how you implement this method in SCW.
uint256 callGasLimitGas limit used while calling the SCW method from EntryPoint contract using 'callData' above.
uint256 verificationGasLimitThis value is used for multiple purposes. It is used as gas limit while calling SCW Factory contract, calling verification methods on SCW and Paymaster and calling postOp method on Paymaster. In short this is gas limit used in calling verification methods on SCW and Paymaster along with postOp method on Paymaster. To be more precise, on top of it, there are other lines in EP whose gas used is accounted in verificationGasLimit.
uint256 preVerificationGasThis field is also critical to understand properly. In short, bundler can make profit using this field, if used properly. This is the gas counted on EP as a part of transaction execution which can't be tracked on chain using gasleft() opcode.
uint256 maxFeePerGasThis is the max fee per unit of gas that UserOp is willing to pay. It is similar to how maxFeePerGas is defined in EIP-1559 for gas calculation of Ethereum transaction. EntryPoint uses this field to calculate gas price for the refund calculation to bundler. gasPrice = min(maxFeePerGas, maxPriorityFeePerGas + block.basefee)
uint256 maxPriorityFeePerGasThis is max priority fee per gas that UserOp is willing to pay. It is similar to how maxPriorityFeePerGas is defined in EIP-1559 for gas calculation of ethereum transaction. gasPrice = min(maxFeePerGas, maxPriorityFeePerGas + block.basefee)
bytes paymasterAndDataIt contains bytes representing paymaster related information. First 20 bytes is paymaster address and rest represents data to be used by Paymaster for verification. It is empty, if paymaster is not used to sponsor the transaction for given UserOp.
bytes signatureIt represent the data to be passed to SCW for verification purpose. Usually it's the signature of userOpHash signed by the owner of SCW but it can be utilised in other ways also.
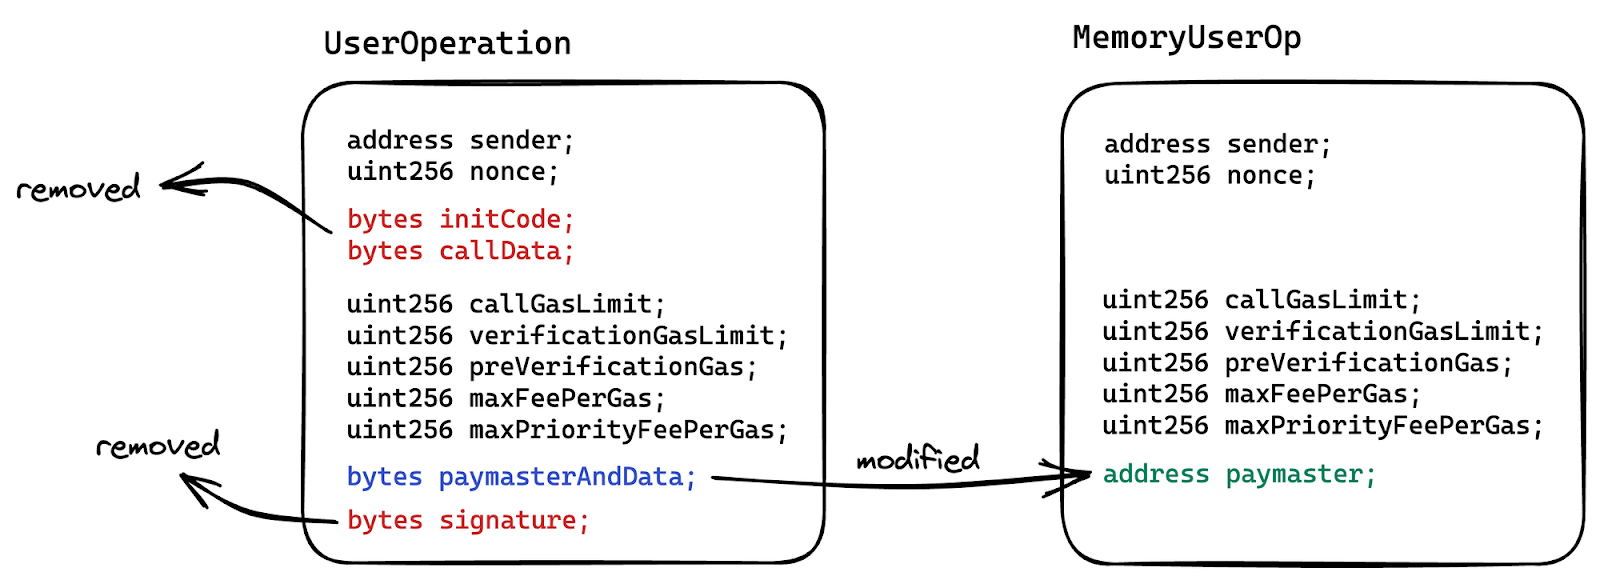
MemoryUserOp

This struct is created for internal purposes in EntryPoint. It is simply a memory copy of UserOperation’s static fields. It excludes the callData, initCode, signature and paymasterData part of the ‘paymasterAndData’ field. From the paymasterAndData field, it extracts the paymaster address and add it as ‘paymaster’ field.

In EntryPoint many internal functions are called and instead of passing around the UserOperation object, MemoryUserOp is passed to save on gas whenever possible.

It’s easy to visualise in the diagram below how MemoryUserOp is created from UserOperation. If you observe closely, you can see all bytes type fields are either removed or modified into fixed length types.

Memoryuserop

UserOpInfo

This is another internal struct defined in EntryPoint. It contains 5 fields whose values are calculated in EntryPoint using the UserOperation fields.

note

It might be a lot to understand all the explanations of fields above. Especially in one sitting. It takes time. I needed to process them multiple times to understand them better. If you get those fields then all good but if you’re still confused, we’ll try to help you understand these fields better when we explain EP code.

FieldDescription
MemoryUserOp mUserOpIt is the MemoryUserOp object as described above.
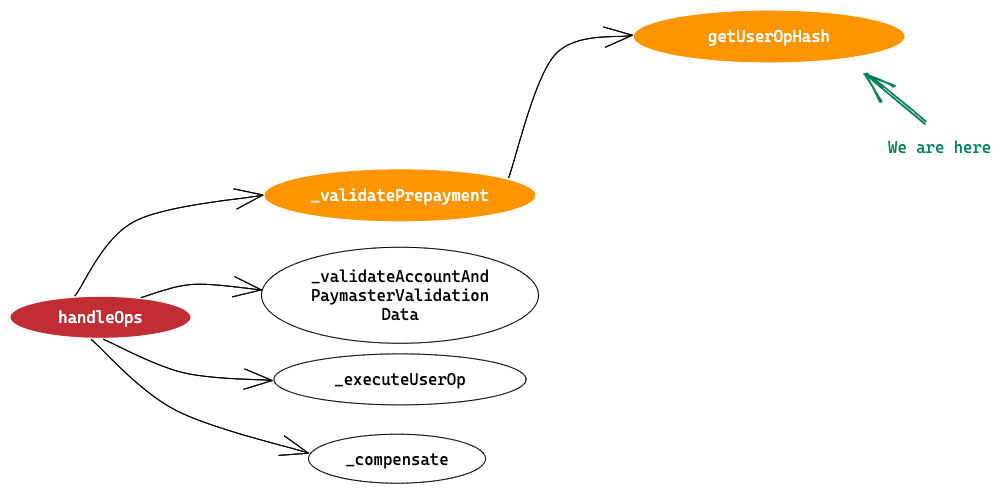
bytes32 userOpHashIt contains hash of UserOperation object. It creates the hash by first removing the signature field from UserOp, then packing all fields in bytes object and then applying keccak256 and abi.encode functions in solidity on top of it.
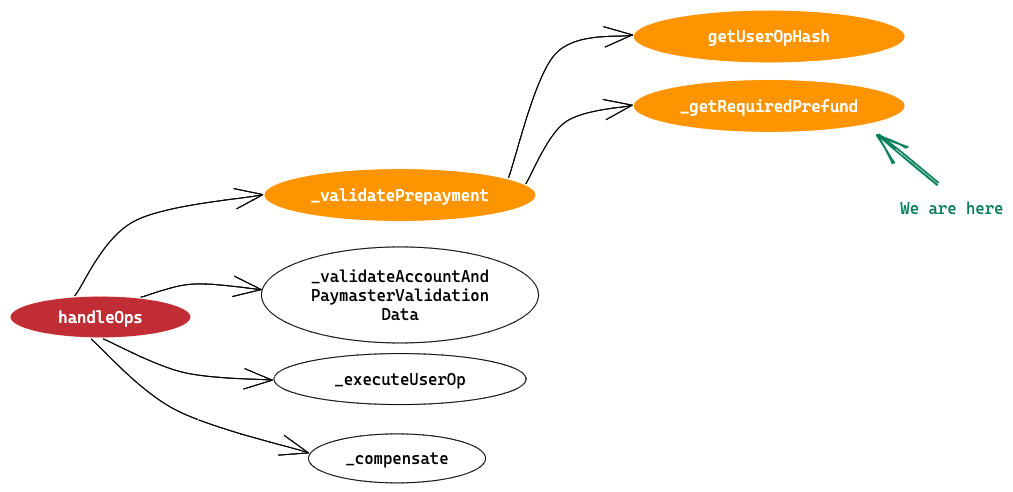
uint256 refundIt is the max amount of gas fee deducted from the deposit (paymaster or SCW deposit) before any execution is done in EntryPoint. It is done to ensure that sponsor of the transaction has sufficient amount in deposit to pay for the gas. Later if actual gas used in the operation is less than the refund, extra amount is refunded back in sponsor deposit.
uint256 contextOffsetIt is the memory offset of context object returned by Paymaster when EP calls validatePaymasterUserOp method. This is calculated to avoid passing the context object itself while calling internal functions, instead this uint256 value is passed around and whenever EP needs context object, it reads from the memory. This is done to save gas in EP.
uint256 preOpGasIt contains the gas used on chain till the verification steps are completed in EP + userOp.preVerificationGas. It is used later in the execution when EP needs to calculate the actual gas cost used on chain to compare it with the refund value. So it can decided whether to refund any extra amount in sponsor deposit or not. On chain gas used is tracked using gasleft() opcode.

Quick Recap

We understand the basic definitions of key terms used in EntryPoint and we have knowledge of three data structures UserOperation, UserOpInfo, MemoryUserOp and their fields.

We also know that MemoryUserOp and UserOpInfo objects are only created in memory from UserOperation object, mainly to save gas during the operation and to pass on some calculated fields to internal function calls in a structured way. Only UserOperation is passed to EntryPoint from outside.

Interfaces used in EntryPoint

EntryPoint contract interacts with three major entities: The Wallet Factory contract, Smart Contract Wallet and Paymaster. For Factory contract there is no defined interface but for SmartContractWallet and Paymaster there are interfaces defined in this ERC.

Smart Contract Wallet Interface


interface IAccount {
function validateUserOp (UserOperation calldata userOp, bytes32 userOpHash, uint256 missingAccountFunds) external returns (uint256 validationData);
}

Paymaster Interface


function validatePaymasterUserOp(UserOperation calldata userOp, bytes32 userOpHash, uint256 maxCost) external returns (bytes memory context, uint256 validationData);

function postOp(PostOpMode mode, bytes calldata context, uint256 actualGasCost) external;

enum PostOpMode {
opSucceeded, // user op succeeded
opReverted, // user op reverted. still has to pay for gas.
postOpReverted // user op succeeded, but caused postOp to revert
}

Now we’ll be able to better relate the business logic when we go through the EP code line by line.

Up next: In Part 2 of this post, we’ll be Decoding EntryPoint code line by line.

· 34 min read

This is Part-2 of our series on decoding EntryPoint and UserOps with ERC-4337. For introduction & basic definitions, please check out part-1.

This part will dive deeper into the line by line code and transaction flow.

Decoding EntryPoint code line by line

tip

While going through this explanation i recommend you open the EntryPoint code in another tab/screen to compare the actual code to this explanation. Here is the code Github link.

Before proceeding lets make a mental image of all the methods are going to be called and their call hierarchy.

├─ handleOps
└─├── _validatePrepayment
│ ├── getUserOpHash
│ ├── _getRequiredPrefund
│ ├── _validateAccountPrepayment
│ │ ├── _createSenderIfNeeded
│ │ └── IAccount(sender).validateUserOp
│ │
| ├── _validateAndUpdateNonce
│ └── _validatePaymasterPrepayment
│ └── Paymaster(paymaster).validatePaymasterUserOp

├── _validateAccountAndPaymasterValidationData
├── _executeUserOp
│ ├── innerHandleOp
│ │ ├── SCW.call()
│ │ └── _handlePostOp
│ └── _handlePostOp
└── _compensate

The first point of interaction with EntryPoint is handleOps method. This method is called by Bundlers to execute a bundle of UserOperations.

hanldeOps method

We are here

You’ll find more “We are here” sections, that will help you visualise where in the call hierarchy you are right now in EntryPoint contract. We are starting with handleOps method which is the entry point method, so we see only this method in the image. In next sections you’ll see more method calls branching out of handleOps method.

handleops

Function decleration


function handleOps(UserOperation[] calldata ops, address payable beneficiary) public nonReentrant

This is a public function with nonReentrant modifier(to prevent reentrancy attacks) that accepts two parameters:

UserOperation[] calldata ops ⇒ Array of UserOperation objects with calldata storage.

address payable beneficiary ⇒ Beneficiary address where the gas is refunded after execution. This can be any address where bundler wants to receive the refund.

note

handleOps is called by the bundler account and if bundler send this transaction in public mempool on blockchain validator node, anyone can frontrun this transaction and change the beneficiary address so front runner can get the refund of this transaction. So it’s important for bundler to send these transaction via private RPC to node providers or Block Builders so it doesn’t end up in public mempool.

Function Definition

uint256 opslen = ops.length;                               // Get the length of UserOperation array passed
UserOpInfo[] memory opInfos = new UserOpInfo[](opslen); // Create array of UserOpInfo type of same length as UserOperation array

We are inside => handleOps

Above lines are self explanatory. We define an array of UserOpInfo type of same length as of UserOperation array. So we can see that for each UserOperation there is a UserOpInfo object that we can access.

Proceeding to next lines of code,

unchecked {
for (uint256 i = 0; i < opslen; i++) {

UserOpInfo memory opInfo = opInfos[i];

(uint256 validationData, uint256 pmValidationData) = _validatePrepayment(i, ops[i], opInfo);

_validateAccountAndPaymasterValidationData( i, validationData, pmValidationData, address(0) );
}

We are inside => handleOps

Here an unchecked block is started (it’s closed at the end of the method) and we start a for loop that will iterate over each UserOp object. In each iteration,

  1. We get the UserOpInfo object at same index position as current UserOp object in their corresponding array. At this point this object is completely empty.
  2. We call an internal method _validatePrepayment, that takes the for loop index, UserOp object and UserOpInfo object as input parameter and returns two validation data fields. First one corresponds to validation data for SCW and other one for Paymaster.
  3. Now we call another internal method _validateAccountAndPaymasterValidationData whose purpose is to validate the validation data we got in step 2 above.
	uint256 collected = 0;
emit BeforeExecution();

for (uint256 i = 0; i < opslen; i++) {
collected += _executeUserOp(i, ops[i], opInfos[i]);
}
} // Closing Unchecked block.

We are inside => handleOps

A BeforeExecution() event is emitted to mark the flow where any event emitted before this event, is part of the validation.

For each UserOp, an internal function _executeUserOp is called which internally calls the SCW and do the actual execution (calling a dapp smart contract or transferring funds to other address etc) and also calls postOp method on Paymaster if paymaster info is available in UserOp.

It returns the total gasFee for this UserOp that needs to be refunded to the beneficiary.

This happen for each UserOperation, and the fee refund for each UserOp is accumulated in collected variable, which will contain the total gas fee refund to be given to beneficiary for all the UserOp.

Next,

_compensate(beneficiary, collected);

We are inside => handleOps

At last, _compensate method is called. It’s a very simple function which just transfer the collected amount of native currency to the beneficiary address. Nothing else happens in this method.

Pseudo Code

Here is a simple pseudo code for you to understand what exactly is happening in handleOps method.

Pseudo code for handleOps function:

  1. Take the length of userOps as n.
  2. Create a UserOpInfo array of length n.
  3. For each user operation (Verification Loop):
    1. Call _validatePrepayment(index, userOp, userOpInfo), which returns validationData and paymasterValidationData.
    2. Call validateAccountAndpaymasterValidationData(index, validationData, pmValidationData, address(0)).
  4. For each user operation (Execution Loop):
    1. Call _executeUserOp(index, userOp, userOpInfo), which returns the gas fee to be refunded to beneficiary.
    2. Sum all the fee refunds for each user operation.
  5. Compensate the beneficiary address with all the collected gas fee.

Summary

To make it easier to understand, there are four main method calls that occur in handleOps:

  1. validatePrepayment
  2. validateAccountAndPaymasterValidationData
  3. executeUserOp
  4. compensate

We are here

handleops-downstream

Now that we have simple idea of 4 methods that are being called from handleOps method, let’s see what’s happening inside each method

validatePrepayment method

We are here

handleops-validateprpayment

Function Declaration


function _validatePrepayment(uint256 opIndex, UserOperation calldata userOp, UserOpInfo memory outOpInfo)
private returns (uint256 validationData, uint256 paymasterValidationData) {

We are inside ⇒ handleOps > validatePrepayment

Remember this function is being called from the Verification Loop in hanldeOps method, so

  1. First parameter is the index of the for loop happening in handleOps
  2. Second parameter is the UserOp object itself
  3. Third parameter is UserOpInfo object. This is an empty object. It’ll be initialised in this method.

Returns,

validationData ⇒ validation data returned by Smart Contract Wallet validateUserOp method

paymasterValidationData ⇒ validation data returned by Paymaster validatePaymasterUserOp method

Function Definition

This function has below responsibilities,

  1. Create and Initialise MemoryUserOp type object
  2. Deploy new SCW if needed
  3. Validate account and paymaster data (if defined)
  4. Perform some gas fields validation logic
  5. Initialise UserOpInfo type object outOpInfo

Let’s start with the code


uint256 preGas = gasleft();

MemoryUserOp memory mUserOp = outOpInfo.mUserOp;

_copyUserOpToMemory(userOp, mUserOp);

outOpInfo.userOpHash = getUserOpHash(userOp);

In first line the on chain gas tracking is started. We get the amount of gas left at the start of the method.

Next, we are taking the mUserOp field from the userOpInfo object.

Then we initialise the mUserOp object using values from userOp. Check here to see how it is done visually.

Next we calculate userOpHash field.

We are here

userophash

In actual code there are internal method calls that happens to get userOpHash but here we’ll just combine all method calls and present a simple code to see how userOpHash is calculated


function getUserOpHash(
UserOperation calldata userOp
) public view returns (bytes32) {
bytes32 memory hash = keccak256(pack(userOp));
return keccak256(abi.encode(hash, address(this), block.chainid));
}

function pack(
UserOperation calldata userOp
) internal pure returns (bytes memory ret) {
//lighter signature scheme. must match UserOp.ts#packUserOp
bytes calldata sig = userOp.signature;
// copy directly the userOp from calldata up to (but not including) the signature.
// this encoding depends on the ABI encoding of calldata, but is much lighter to copy
// than referencing each field separately.
assembly {
let ofs := userOp
let len := sub(sub(sig.offset, ofs), 32)
ret := mload(0x40)
mstore(0x40, add(ret, add(len, 32)))
mstore(ret, len)
calldatacopy(add(ret, 32), ofs, len)
}
}

We are inside ⇒ handleOps > validatePrepayment > getUserOpHash

The pack function is an internal function that takes a UserOperation object and returns a bytes array. It does this by copying the UserOperation object from calldata up to, but not including, the signature field. It then returns this data as a bytes array.

The purpose of this function is to create a lighter representation of the UserOperation object that can be more efficiently passed around in memory.

Next,


// validate all numeric values in userOp are well below 128 bit, so they can safely be added
// and multiplied without causing overflow
uint256 maxGasValues = mUserOp.preVerificationGas |
mUserOp.verificationGasLimit |
mUserOp.callGasLimit |
userOp.maxFeePerGas |
userOp.maxPriorityFeePerGas;
require(maxGasValues <= type(uint120).max, "AA94 gas values overflow");

We are inside ⇒ handleOps > validatePrepayment

The bitwise OR operation (|) combines some userOp values by setting each bit in the result to 1 if the corresponding bit is set in any of the input values. This means that the resulting maxGasValues variable will contain a value that is a combination of all of the specified gas limits and fees.

Here, the code checks that all numeric values in the userOp object are below 128 bits, so that they can be safely added and multiplied without causing an overflow error.

Next,


uint256 gasUsedByValidateAccountPrepayment;
uint256 requiredPreFund = _getRequiredPrefund(mUserOp);

We are inside ⇒ handleOps > validatePrepayment

Here we defined a variable gasUsedByValidateAccountPrepayment that we’ll initialise in next lines, and we calculate requiredPreFund by calling _getRequiredPrefund(mUserOp) method.

Before we understand what _requiredPreFund is we need to understand that one of the responsibilities of EntryPoint is to ensure that bundler is paid back the gas fee used to execute UserOperations. Now the question is who pays this gas to bundler. This is either paid by Paymaster or Smart Contract Wallet itself.

In order to do that, Paymaster or SCW are expected to do a deposit of ether (or native currency of the blockchain) on EP contract and then EP uses this deposit to pay back the bundler.

Now that we understand this, let’s come back to _requiredPreFund calculation. It is the max amount of gas fee that is pre deducted from Paymaster/SCW deposit on EP to ensure that EP has enough deposit to pay back the bundler. Later if the actual gas cost comes out to be less than the requiredPreFund, excess amount is given back to the EP deposit.

function _getRequiredPrefund(MemoryUserOp memory mUserOp) internal pure returns (uint256 requiredPrefund) {
unchecked {
// when using a Paymaster, the verificationGasLimit is used also to as a limit for the postOp call.
// Our security model might call postOp eventually twice
uint256 mul = mUserOp.paymaster != address(0) ? 3 : 1;
uint256 requiredGas = mUserOp.callGasLimit +
mUserOp.verificationGasLimit *
mul +
mUserOp.preVerificationGas;

requiredPrefund = requiredGas * mUserOp.maxFeePerGas;
}
}


We are inside ⇒ handleOps > validatePrepayment > _getRequiredPrefund

getrequiredprefund

We all know how to calculate gas fee using the formula GasFee = GasPrice * GasUsed

Here the gasPrice part is calculated from mUserOp.maxFeePerGas because we are trying to calculate the maximum fee that can be deducted from EP deposit.

And the gasUsed part is calculate using the formula

callGasLimit + verificationGasLimit * (3 in case of Paymaster or 1 in absense of Paymaster) + preVerificationGas

info

These Gas Limits are all coming from UserOperation object passed from outside. And now you should know that why we can’t just pass a very high number in these fields to avoid OOG(Out Of Gas) errors. Because higher values would mean high gas fee pre deducted from the deposit on EP, and even if the deposit would be enough to cover the actual gas fee, your transaction would revert here. So this is actually a challenge for clients when generating these gasLimit values for UserOperation to be just enough to avoid out of gas errors and not put too high values.

Next,

(gasUsedByValidateAccountPrepayment, validationData)
= _validateAccountPrepayment(opIndex, userOp, outOpInfo, requiredPreFund);

We are inside ⇒ handleOps > validatePrepayment

We are here

validateAccountPrepayment

This step is the validation step done on Smart Contract Wallet, summary of this method is mentioned below.

  1. First the smart contract wallet is created using userOp.initCode if the wallet is not deployed already.
  2. If SCW pays for gas, it checks if wallet deposit on EP is enough to pay for the gas (requiredPrefund calculated above), if not it calculate missingAccountFunds.
  3. Call validateUserOp on SCW, it will return a validationData field.
  4. Again check if wallet deposit on EP is enough to pay for the gas (coz in validateUserOp call in step 3, wallet might have deposited missing funds)
  5. If funds are still not enough, it reverts.
  6. Else it decrement account deposit and calculate total gas used by this method.
  7. Returns total gas used by this method and validationData returned in step 3.
/**
* Call account.validateUserOp.
* Revert (with FailedOp) in case validateUserOp reverts, or account didn't send required prefund.
* Decrement account's deposit if needed
*/
function _validateAccountPrepayment(
uint256 opIndex,
UserOperation calldata op,
UserOpInfo memory opInfo,
uint256 requiredPrefund
)
internal
returns (
uint256 gasUsedByValidateAccountPrepayment,
uint256 validationData
)
{
unchecked {
uint256 preGas = gasleft();
MemoryUserOp memory mUserOp = opInfo.mUserOp;
address sender = mUserOp.sender;
_createSenderIfNeeded(opIndex, opInfo, op.initCode);
address paymaster = mUserOp.paymaster;
numberMarker();
uint256 missingAccountFunds = 0;
if (paymaster == address(0)) {
uint256 bal = balanceOf(sender);
missingAccountFunds = bal > requiredPrefund
? 0
: requiredPrefund - bal;
}
try
IAccount(sender).validateUserOp{
gas: mUserOp.verificationGasLimit
}(op, opInfo.userOpHash, missingAccountFunds)
returns (uint256 _validationData) {
validationData = _validationData;
} catch Error(string memory revertReason) {
revert FailedOp(
opIndex,
string.concat("AA23 reverted: ", revertReason)
);
} catch {
revert FailedOp(opIndex, "AA23 reverted (or OOG)");
}
if (paymaster == address(0)) {
DepositInfo storage senderInfo = deposits[sender];
uint256 deposit = senderInfo.deposit;
if (requiredPrefund > deposit) {
revert FailedOp(opIndex, "AA21 didn't pay prefund");
}
senderInfo.deposit = uint112(deposit - requiredPrefund);
}
gasUsedByValidateAccountPrepayment = preGas - gasleft();
}
}

We are inside ⇒ handleOps > validatePrepayment > _validateAccountPrepayment

Explanation of above code snippet:

  1. First the on chain gas tracking is started.
  2. We get mUserOp and sender from opInfo object. opInfo is the same UserOpInfo object whose type is defined here.
  3. Next we call _createSenderIfNeeded() method to call Factory contract to deploy new SCW if it’s not already deployed.
  4. Call numberMarker() method. This function is used as a checkpoint in the code. It adds a specific opcode in the flow, so that during off chain simulation we can get this while tracing the simulation call in bundlers.
  5. Check if paymaster address is zero, this means that SCW is supposed to pay for the current UserOperation execution.
    1. Calls balanceOf() method defined in the EP to get the deposit balance of sender (SCW)
    2. Check if current deposit is enough to cover the max gas fee for this UserOperation.
  6. Calls validateUserOp method on SCW. It uses mUserOp.verificationGasLimit as gas limit in this call. It pass (userOp, userOpHash, missingAccountFunds) as parameter to validateUserOp method.
  7. It returns a validationData which is stored in the return variable validationData
  8. If validateUserOp call fails, the whole operation reverts.
  9. If SCW is paying for the gas fee, again the deposit is checked to see if it’s enough to cover the max gas fee for this operation. See the explanation above to see why this is done again.
  10. Finish the gas tracking and assigns the total gas used in this method in return variable gasUsedByValidateAccountPrepayment

Next,

if (!_validateAndUpdateNonce(mUserOp.sender, mUserOp.nonce)) {
revert FailedOp(opIndex, "AA25 invalid account nonce");
}

// a "marker" where account opcode validation is done and paymaster opcode validation is about to start
// (used only by off-chain simulateValidation)
numberMarker();

bytes memory context;
if (mUserOp.paymaster != address(0)) {
(context, paymasterValidationData) = _validatePaymasterPrepayment(
opIndex,
userOp,
outOpInfo,
requiredPreFund,
gasUsedByValidateAccountPrepayment
);
}

We are inside ⇒ handleOps > validatePrepayment

validatepaymasterprepayment

First, _validateAndUpdateNonce is called which takes mUserOp.sender and mUserOp.nonce as argument. It validate the nonce field and increment the value against sender address.

Note: Smart Contract Wallet is not supposed to handle the nonce field in validateUserOp method anymore as this is done in EntryPoint now.

function _validateAndUpdateNonce(address sender, uint256 nonce)
internal returns (bool) {
uint192 key = uint192(nonce >> 64);
uint64 seq = uint64(nonce);
return nonceSequenceNumber[sender][key]++ == seq;
}

Explanation of above code snippet:

  1. The nonce in EntryPoint is supposed to be a 2D nonce where both key and sequence number is represented by single uint256 value.
  2. Here first 192 bits represents the key part and rest 64 bits represents sequence value.
  3. For normal operations, key value will be 0 and sequence value is incremented sequentially.
  4. That’s why here first key part is extracted by right shifting nonce value by 64 and casting value to uint192 and then sequence number is extracted by casting nonce value to uint64.
  5. Then the stored sequence number is compared with the sequence number from input. If both matches, the stored value is incremented using post ++ operator.

Then the numberMarker() is used again. (Explained here)

And if paymaster is present in UserOperation, an internal method _validatePaymasterPrepayment is called. Summary of this method is mentioned below.

  1. Check if gas used by account validation is less than userOp.verificationGasLimit.
  2. Check if paymaster deposit on EP is enough to cover the max gas fee for this UserOperation.
  3. If not, whole operation reverts.
  4. Else deduct the max gas fee from the paymaster deposit on EP.
  5. Calls validatePaymasterUserOp on Paymaster. It will return a context object and validationData.
  6. Here, context object is totally upto Paymaster to define. EP just pass this context to Paymaster later while calling postOp method.
  7. If call in step 5 fails, whole operation reverts.
/**
* In case the request has a paymaster:
* Validate paymaster has enough deposit.
* Call paymaster.validatePaymasterUserOp.
* Revert with proper FailedOp in case paymaster reverts.
* Decrement paymaster's deposit
*/
function _validatePaymasterPrepayment(
uint256 opIndex,
UserOperation calldata op,
UserOpInfo memory opInfo,
uint256 requiredPreFund,
uint256 gasUsedByValidateAccountPrepayment
) internal returns (bytes memory context, uint256 validationData) {
unchecked {
MemoryUserOp memory mUserOp = opInfo.mUserOp;
uint256 verificationGasLimit = mUserOp.verificationGasLimit;
require(verificationGasLimit > gasUsedByValidateAccountPrepayment, "AA41 too little verificationGas");
uint256 gas = verificationGasLimit - gasUsedByValidateAccountPrepayment;

address paymaster = mUserOp.paymaster;
DepositInfo storage paymasterInfo = deposits[paymaster];
uint256 deposit = paymasterInfo.deposit;
if (deposit < requiredPreFund) {
revert FailedOp(opIndex, "AA31 paymaster deposit too low");
}
paymasterInfo.deposit = uint112(deposit - requiredPreFund);
try
IPaymaster(paymaster).validatePaymasterUserOp{gas: gas}(op, opInfo.userOpHash, requiredPreFund)
returns (bytes memory _context, uint256 _validationData) {
context = _context;
validationData = _validationData;
} catch Error(string memory revertReason) {
revert FailedOp(opIndex, string.concat("AA33 reverted: ", revertReason));
} catch {
revert FailedOp(opIndex, "AA33 reverted (or OOG)");
}
}
}

We are inside ⇒ handleOps > validatePrepayment > _validatePaymasterPrepayment

Explanation of above code snippet:

  1. Get mUserOp object from opInfo. opInfo is the same UserOpInfo object whose type is defined here.
  2. Check if gas used by account validation is less than userOp.verificationGasLimit.
  3. By now this is understood that, userOp.verificationGasLimit value should cover at least the gas for account validation (including account deployment) and paymaster validation.
  4. Get the paymaster deposit from the deposits mapping in EP.
  5. If paymaster deposit is not enough to cover the max gas fee, EP reverts.
  6. Else deduct the max gas fee (requiredPrefund) from paymaster deposit in EP.
  7. Call Paymaster validatePaymasterUserOp method. Pass userOp.verificationGasLimit as gas limit.
  8. Pass (userOp, userOpHash, requiredPrefund) as arguments.
  9. If Paymaster validation call fails, whole operation reverts.
  10. Else return the context object and validation data returned by as returned by validatePaymasterUserOp call.

Quick Recap

Ok take a deep breath, we have done most of the verification part till now. So far as part of UserOperation verification,

  1. We called SCW.validateUserOp() which internally deploys the wallet if required.
  2. We called called Paymaster.validatePaymasterUserOp()

Looks simple, right?

There are many small checks related to gas and deposits inside these methods. So the code might look long, but conceptually its just getting the verification done by SCW and Paymaster. Remember devil is in the details.

Just to remind you again the handleOps flow looks like this

  1. validatePrepayment ← We are here
  2. validateAccountAndPaymasterValidationData
  3. executeUserOp
  4. compensate

We are still at the first step validatePrepayment. Now let’s finish the rest of the part of this method.

Next,

unchecked {
uint256 gasUsed = preGas - gasleft();

if (userOp.verificationGasLimit < gasUsed) {
revert FailedOp(opIndex, "AA40 over verificationGasLimit");
}
outOpInfo.prefund = requiredPreFund;
outOpInfo.contextOffset = getOffsetOfMemoryBytes(context);
outOpInfo.preOpGas = preGas - gasleft() + userOp.preVerificationGas;
}

We are inside ⇒ handleOps > validatePrepayment

We are here

finishvalidateprepayment

Explanation of above code snippet:

  1. We stop the on chain gas tracking.
  2. Now we check if userOp.verificationGasLimit is able to cover the gas used so far.
  3. If not, the whole operation reverts.
  4. Else we proceed and fill out rest of the fields on UserOpInfo object.
  5. outOpInfo.prefund is assigned the requiredPreFund value which is max gas fee deducted from the deposit on EP.
  6. outOpInfo.contextOffset is assigned the offset of context object in memory. Remember context is the object returned by Paymaster.validatePaymasterUserOp call. So instead of assigning the whole context object, we just save its memory offset. So we don’t have to pass around this heavy context object while calling internal methods.
  7. outOpInfo.preOpGas is assigned (Total gas used so far + userOp.preVerificationGas)
tip

As explained at the beginning, UserOpInfo.preOpGas will contain total gas used so far, it includes

  1. The actual logic written in EntryPoint contract
  2. Other gas units, which is a. Base gas fee(21000) b. Gas spent in calling the handleOps and it’s parameters c. Gas that will be used in later part of EntryPoint which can’t be tracked using gasleft() opcode. Will come back to this point again later in this article.

The second point can’t be tracked on chain, so we rely on userOp.preVerificationGas field and assume its value has covered these gas units.

OK, the prePayment part is done, let’s move to the next method that is called from handleOps method.

Just to remind you again the handleOps flow looks like this

  1. validatePrepayment ← This is Done
  2. validateAccountAndPaymasterValidationData ← We’ll begin with this method now
  3. executeUserOp
  4. compensate

validateAccountAndPaymasterValidationData method

Function Declaration

/**
* Revert if either account validationData or paymaster validationData is expired
*/
function _validateAccountAndPaymasterValidationData(
uint256 opIndex,
uint256 validationData,
uint256 paymasterValidationData,
address expectedAggregator
) internal view {

We are inside ⇒ handleOps > validateAccountAndPaymasterValidationData

Remember this function is being called from the Verification Loop in hanldeOps method, so

  1. First parameter is the index of the for loop happening in handleOps
  2. Second parameter is the validation data returned by validateUserOp method on SCW
  3. Third parameter is the validation data returned by validatePaymasterUserOp method on Paymaster
  4. Fourth parameter is the expected aggregator address (This is out of scope for this article, and in our flow address(0) is passed from handleOps

This function doesn’t return anything, it just revert if any of the validation data is not valid.

Function Definition

This is a very small function that just do some validations on the validationData passed to it. Now to understand it better lets go into this validationData we’ve been talking about. How does it look like.

You must have observed that the type of validationData is uint256 which is returned by both SCW and Paymaster.

As per this ERC, the uint256 validationData value returned by SCW or Paymaster, MUST be a packed value consisting of authorizer, validUntil and validAfter timestamps.

Above all three values are packed in a single uint256 value.

authorizer ⇒ 0 for valid signature, 1 to mark signature failure. Otherwise, an address of an authorizer contract. This ERC defines “signature aggregator” as authorizer.

validUntil  ⇒ 6-byte timestamp value, or zero for “infinite”. The UserOp is valid only up to this time.

validAfter  ⇒ 6-byte timestamp. The UserOp is valid only after this time.

It’s upto the SCW or Paymaster to defined these values depending on their own use case. If you are not using BLS wallet or signature aggregator contract, then you can just return 0 value. EP will handle 0 value as positive validation.

validationdataformat

Let's start with the code


(address aggregator, bool outOfTimeRange) = _getValidationData(validationData);

if (expectedAggregator != aggregator) {
revert FailedOp(opIndex, "AA24 signature error");
}
if (outOfTimeRange) {
revert FailedOp(opIndex, "AA22 expired or not due");
}

// pmAggregator is not a real signature aggregator: we don't have logic to handle it as address.
// non-zero address means that the paymaster fails due to some signature check (which is ok only during estimation)
address pmAggregator;
(pmAggregator, outOfTimeRange) = _getValidationData(paymasterValidationData);

if (pmAggregator != address(0)) {
revert FailedOp(opIndex, "AA34 signature error");
}
if (outOfTimeRange) {
revert FailedOp(opIndex, "AA32 paymaster expired or not due");
}

We are inside ⇒ handleOps > validateAccountAndPaymasterValidationData

We are here

validateaccoutnandpaymaster

The code is self explanatory,

  1. First the validationData is decoded into aggregator address and a boolean value which tells if validUntil and validAfter part of validationData is valid as per the block.timestamp or not.
  2. If aggregator returned by SCW, doesn’t match with expectedAggregator, EP reverts.
  3. Remember expectedAggregator is passed as address(0) from handleOps. So in this flow SCW just need to return 0 value.
  4. If validUntil and validAfter are out of time range as per block.timestamp, EP reverts.
  5. Step 1-4 is repeated for paymasterValidationData as well.
  6. Only with one exception that if aggregator address is non-zero, EP reverts. So paymaster must return 0 value for this in validatePaymasterUserOp method.
note

Note that we are not doing any gas tracking in this function. So whatever gas is used here, needs to be accounted in userOp.preVerificationGas field. This value comes from outside and client calculates this value while building the UserOperation.

OK, our second method in handleOps is also done. Let’s see where we are now.

handleOps flow looks like this

  1. validatePrepayment ← This is Done
  2. validateAccountAndPaymasterValidationData ← This is Done
  3. executeUserOp ← We’ll begin with this method now
  4. compensate

executeUserop method

Function Declaration

/**
* execute a user op
* @param opIndex index into the opInfo array
* @param userOp the userOp to execute
* @param opInfo the opInfo filled by validatePrepayment for this userOp.
* @return collected the total amount this userOp paid.
*/
function _executeUserOp(
uint256 opIndex,
UserOperation calldata userOp,
UserOpInfo memory opInfo
) private returns (uint256 collected) {

We are insldue => handleOps > executeUserOp

Remember this function is being called from the Execution Loop in hanldeOps method. So

First parameter is the index of the for loop happening in handleOps Second parameter is UserOperation to be executed. Third parameter is object. In earlier part of code, this object has been initialised using values from userOp. ‍

Returns,

collected ⇒ the amount of gas fee that needs to be compensated to the beneficiary address passed in handleOps method. It corresponds to total gas fee used in verification and execution and any extra execution of given UserOperation.

note

This amount should be ≥ the gas fee paid by the bundler transaction to call handleOps() otherwise there’s no incentive for bundler to execute this UserOperation.

We are here

executeuserop

Function Definition

Main purpose of this function is to execute the UserOperation, as validation has been done already and take any action that needs to be done post execution. Let’s start with the code

uint256 preGas = gasleft();
bytes memory context = getMemoryBytesFromOffset(opInfo.contextOffset);

We are inside ⇒ handleOps > executeUserOp

  1. First, the on chain gas tracking again starts.
  2. We fetch the context object from the memory using opInfo.contextOffset. This context object was returned by Paymaster when we called validatePaymasterUserOp. Now we need to pass this object back to Paymaster after userOp execution, when we’ll call postOp method of Paymaster.

Next,

try this.innerHandleOp(userOp.callData, opInfo, context) returns (
uint256 _actualGasCost
) {
collected = _actualGasCost;
} catch {
bytes32 innerRevertCode;
assembly {
returndatacopy(0, 0, 32)
innerRevertCode := mload(0)
}
// handleOps was called with gas limit too low. abort entire bundle.
if (innerRevertCode == INNER_OUT_OF_GAS) {
//report paymaster, since if it is not deliberately caused by the bundler,
// it must be a revert caused by paymaster.
revert FailedOp(opIndex, "AA95 out of gas");
}

uint256 actualGas = preGas - gasleft() + opInfo.preOpGas;
collected = _handlePostOp(
opIndex,
IPaymaster.PostOpMode.postOpReverted,
opInfo,
context,
actualGas
);
}

We are inside ⇒ handleOps > executeUserOp

Explanation of above code snippet:

  1. It starts with a try-catch block where this calls an internal method innerHandleOp that does the actual execution of userOp.
  2. innerHandleOp returns the actualGasCost for given userOp.
  3. It’s interesting to see all the code in catch block. Let’s see what it is.
  4. In case call to innerHandleOp reverts, code execution will come to this catch block. Here we need to know the failure reason in catch block.
  5. The flow will come to catch block because of following reasons
    1. If OOG error comes during execution
    2. If paymaster postOp method reverts which called from innerHandleOp method.
  6. Now in catch block, first the revertCode is extracted using assembly code.
    1. returndatacopy(0, 0, 32) copies 32 bytes of data from EP contract's memory starting at position 0 (which is where the returned data from the inner function call will be stored) to memory position 0
    2. innerRevertCode := mload(0) loads 32 bytes of data from the memory position 0 and stores it in the **innerRevertCode**variable.
  7. If the revertCode matches with INNER_OUT_OF_GAS, EP reverts the operation.
    1. This INNER_OUT_OF_GAS can be emitted by OOG checks in case bundler didn’t pass enough gas limit while calling handleOps.
    2. But even a malicious paymaster can revert with the same error code and cause a bundler to think it is "internal" error. That’s why in this case bundler should report the paymaster if this happens.
  8. If the revert reason is something else, then EP calls _handlePostOp() method with IPaymaster.PostOpMode.postOpReverted mode. We’ll come back to this method later.

Now let’s go inside innerHandleOp method and see what’s happening.

innerhandleop

/**
* inner function to handle a UserOperation.
* Must be declared "external" to open a call context, but it can only be called by handleOps.
*/
function innerHandleOp(
bytes memory callData,
UserOpInfo memory opInfo,
bytes calldata context
) external returns (uint256 actualGasCost) {
uint256 preGas = gasleft();
require(msg.sender == address(this), "AA92 internal call only");
MemoryUserOp memory mUserOp = opInfo.mUserOp;

uint callGasLimit = mUserOp.callGasLimit;
unchecked {
// handleOps was called with gas limit too low. abort entire bundle.
if (gasleft() < callGasLimit + mUserOp.verificationGasLimit + 5000) {
assembly {
mstore(0, INNER_OUT_OF_GAS)
revert(0, 32)
}
}
}

IPaymaster.PostOpMode mode = IPaymaster.PostOpMode.opSucceeded;
if (callData.length > 0) {
bool success = Exec.call(mUserOp.sender, 0, callData, callGasLimit);
if (!success) {
bytes memory result = Exec.getReturnData(REVERT_REASON_MAX_LEN);
if (result.length > 0) {
emit UserOperationRevertReason(opInfo.userOpHash, mUserOp.sender, mUserOp.nonce, result);
}
mode = IPaymaster.PostOpMode.opReverted;
}
}

unchecked {
uint256 actualGas = preGas - gasleft() + opInfo.preOpGas;
//note: opIndex is ignored (relevant only if mode==postOpReverted, which is only possible outside of innerHandleOp)
return _handlePostOp(0, mode, opInfo, context, actualGas);
}
}

We are inside ⇒ handleOps > executeUserOp > innerHandleOp

  1. First thing to notice here is that it is declared as external method to open a call context, but it can only be called by handleOps method.
  2. It starts on chain gas tracking using gasleft() opcode.
  3. Check if msg.sender is address of EntryPoint only, else reverts.
  4. Then in unchecked block, it checks if gas left so far is less than callGasLimit + mUserOp.verificationGasLimit + 5000
    1. Here callGasLimit is the userOp.callGasLimit ⇒ gas limit used while calling SCW method to execute userOp.callData
    2. We add userOp.verificationGasLimit coz we are going to make a call to Paymaster postOp method where this value is used as gas limit.
    3. This 5000 value is there to protect against an edge-case where bundler crafted gas-limit can cause inner call (SCW call) to revert and still pay.
  5. If step 4 is true, it revert with INNER_OUT_OF_GAS as revert reason.
  6. Else we proceed to call SCW using userOp.callData. Here a library Exec is used to make this call. This is regular assembly code to call a destination with callData.
  7. You can check Exec library code here.
  8. If SCW call revert, the EP does’t revert but it just emits an event and initialise mode variable with value IPaymaster.PostOpMode.opReverted
  9. This mode variable is passed as argument to _handlePostOp method (called at the end of this method), for it to know from where it is being called.
  10. Remember _handlePostOp() is also called from _executeUserOp method in the catch block.
  11. The last unchecked block, first calculate total gas used so far till this point.
  12. It is calculated as total gas used in this method + all earlier gas used starting from handleOps call which is already captured in opInfo.preOpGas
  13. At last it calls _handlePostOp.

Now let’s go inside _handlePostOp method and see what’s happening. This is the final internal method call in Execution Flow.

_handlePostOp method

note

Till here, SCW execution is completed and now we just need to make last call to Paymaster postOp method.

handlepostop

This is a bit long function, so lets break down this in Function Declaration and Function Definition

Function Declaration

function _handlePostOp(
uint256 opIndex,
IPaymaster.PostOpMode mode,
UserOpInfo memory opInfo,
bytes memory context,
uint256 actualGas
) private returns (uint256 actualGasCost) {

We are inside ⇒ handleOps > executeUserOp > innerHandleOp > _handlePostOp

opIndex ⇒ index in the user operation batch mode ⇒ whether is called from innerHandleOp, or outside (postOpReverted) opInfo ⇒ userOp fields and info collected during validation context ⇒ the context returned in validatePaymasterUserOp actualGas ⇒ the gas used so far by this user operation

Function Definition

This method can be a bit hard to understand so let’s start to understand the code in chunks.

uint256 preGas = gasleft();
unchecked {
address refundAddress;
MemoryUserOp memory mUserOp = opInfo.mUserOp;
uint256 gasPrice = getUserOpGasPrice(mUserOp);

We are inside ⇒ handleOps > executeUserOp > innerHandleOp > _handlePostOp

This is the part where we calculate the userOp gas price.

  1. It calculate the gasPrice to be used to calculate the final gas cost of this userOp.
  2. maxFeePerGas and maxPriorityFeePerGas param are taken from userOp for this.
  3. gasPrice ← min(maxFeePerGas, maxPriorityFeePerGas + block.basefee) Calculation is same as done in EIP-1559 for transactions.

Next,

address paymaster = mUserOp.paymaster;
if (paymaster == address(0)) {
refundAddress = mUserOp.sender;
} else {
refundAddress = paymaster;
if (context.length > 0) {
actualGasCost = actualGas * gasPrice;
if (mode != IPaymaster.PostOpMode.postOpReverted) {
IPaymaster(paymaster).postOp{ gas: mUserOp.verificationGasLimit} (mode, context, actualGasCost);
} else {
// solhint-disable-next-line no-empty-blocks
try
IPaymaster(paymaster).postOp{gas: mUserOp.verificationGasLimit} (mode, context, actualGasCost)
{} catch Error(string memory reason) {
revert FailedOp(opIndex, string.concat("AA50 postOp reverted: ", reason)
);
} catch {
revert FailedOp(opIndex, "AA50 postOp revert");
}
}
}
}

We are inside ⇒ handleOps > executeUserOp > innerHandleOp > _handlePostOp

  1. Then we check who is paying for the gas for this userOp, SCW or Paymaster. Then we assign a refundAddress accordingly.
  2. If context object is not empty, we proceed to call postOp method on Paymaster.
  3. If this call is coming from innerHandleOp method, it calls postOp method. Here we don’t care if postOp reverts or not. EP will still pay the bundler the gas fee for this userOp.
  4. If this call is coming from _executeUserOp catch block, it calls postOp method.
    1. If postOp reverts this time, the whole operation reverts with proper revert reason (if available).
    2. If flow is coming here, that means postOp is already called once, and this is second time the postOp is called.

Next,

actualGas += preGas - gasleft();
actualGasCost = actualGas * gasPrice;
if (opInfo.prefund < actualGasCost) {
revert FailedOp(opIndex, "AA51 prefund below actualGasCost");
}
uint256 refund = opInfo.prefund - actualGasCost;
_incrementDeposit(refundAddress, refund);
bool success = mode == IPaymaster.PostOpMode.opSucceeded;
emit UserOperationEvent(
opInfo.userOpHash,
mUserOp.sender,
mUserOp.paymaster,
mUserOp.nonce,
success,
actualGasCost,
actualGas
);

We are inside ⇒ handleOps > executeUserOp > innerHandleOp > _handlePostOp

  1. At the end, it calculate the final gas cost of user operation.
  2. It checks if the actual gas cost used is less than the requiredPrefund calculated very early in handleOps flow.
  3. If yes, then it refund the excess gas cost in the EP deposit corresponding to refundAddress calculated earlier.
  4. It emits UserOperationEvent event with all relevant information. The success field indicated if call to SCW was succeeded or not.

OK we are almost done with the whole handleOps flow. Lets see where we are now

handleOps flow looks like this

  1. validatePrepayment ← This is Done
  2. validateAccountAndPaymasterValidationData ← This is Done
  3. executeUserOp ← This is Done
  4. compensate ← We’ll begin with this method now

compensate method

We are here

validationdataformat

Function Data

/**
* compensate the caller's beneficiary address with the collected fees of all UserOperations.
* @param beneficiary the address to receive the fees
* @param amount amount to transfer.
*/
function _compensate(address payable beneficiary, uint256 amount) internal {

We are inside ⇒ handleOps > _compensate

This method is not called from any for loop in handleOps so there’s no index parameter.

  1. First parameter is the beneficiary address where the EP should transfer gas fee from its deposit.
  2. Second parameter is the amount of gas fee to be transferred to beneficiary.

Function Definition

This is very simple and small method that just transfers the gas fee from EP deposits to beneficiary address.

Let’s check the code


require(beneficiary != address(0), "AA90 invalid beneficiary");
(bool success, ) = beneficiary.call{value: amount}("");
require(success, "AA91 failed send to beneficiary");

This code is pretty self explanatory,

  1. It checks if beneficiary is not a zero address.
  2. Then it transfers the gas fee in native currency of blockchain to the beneficiary.
  3. It checks if the transfer was successful or not. If not, it reverts.

And we are done!

Huh, let’s take a break. Grab a cup of coffee or whatever calm your mind.

This was a pretty long piece of code to understand. And it might take a lot of reading again to understand it end to end.

So I’d recommend you go through the EntryPoint contract code yourself now and try to make some other developer in your team understand this code.

Quick Recap

If you have made it this far, it calls for a recap of some important concept again.

  1. EntryPoint (EP) contract is the core contract in ERC-4337 which orchestrate the whole transaction flow of UserOperation by interacting with SCW Factory contract, SCW contract and Paymaster contract.
  2. EP always have deposit in native token on the blockchain. If someone wants to pay gas in ERC20 tokens for UserOp then it needs to be handled in Paymaster or SCW. For example, in case SCW want’s to pay for the gas in ERC20 token, it needs to first convert those ERC20 to native token (by interacting with some DEX) and then deposit it on EP contract.
  3. EP has handleOps method which is called by the bundler. Bundler can pass multiple UserOperation to this method and a beneficiary address where the gas refund goes from EP.
  4. EP stores the gas deposited by either Paymaster or SCW. Based on the UserOperation fields it decides from which deposit it will refund the bundler(beneficiary) address.
  5. EP does its best to calculate the actual gas used during the execution. But unfortunately it can’t track all of the gas used, so it relies on UserOp.preVerificationGas field to cover the untracked gas during the execution.
    1. So higher value of preVerificationGas means more profit for the Bundler.
  6. UserOp.maxFeePerGas and UserOp.maxPriorityFeePerGas decides the gasPrice to be used by EP for calculate the bundler refund.
    1. So Bundler should try to send handleOps transaction with lower gas fee for actual handleOps transaction to make some profit.

· 15 min read

With our new modular architecture, Biconomy is evolving Smart Account from wallet layer to a platform! The Smart Account Platform enables developers to easily & securely plug-in programmable modules to endlessly extend smart account capabilities. These modules leverage the power of Account Abstraction to allow for custom validation schemes and execution environments. This approach enables greater flexibility and customization for developers and end-users, opening up new possibilities for use cases in the blockchain space.

Account Abstraction and Smart Contract Wallets

Smart Contract Wallets existed before Account Abstraction. Until recently it wasn’t rare to see SCW’s actually giving a worse user experience for mainstream users than that of EOAs.

Account Abstraction solves several problems that hindered the mass adoption of Web 3.

By simplifying transaction handling, enhancing security, improving flexibility and interoperability, and removing gas-paying limitations, it brings Web3 closer to mainstream users. It pushes the envelope for the future of blockchain technology. These features can only be achieved with programmable user accounts becoming EVM eco-system first-class citizens.

What does it mean for Smart Contract Wallets? It means SCWs can now become Smart Accounts: non-dependent on EOAs, agnostic to the encryption algorithm, recoverable, user friendly.

And now with Smart Accounts Platform, they become modular!

Why is Modularity important?

TL;DR: It’s much easier to leverage all the potential of Account Abstraction with Modularity.

Modularity in EIP-4337 compatible Smart Accounts offers several key advantages that make them more adaptable, efficient, and future-proof.

Custom validation algorithms are one of the key features of AA. The possibility to sign transactions not only with the private key of the ECDSA-based EOA but with a passkey issued by your smartphone sounds tempting.

Session keys, which are, in fact, temporary private keys with customizable permissions and expiry time, are another way of authorizing user operations on behalf of a Smart Account owner.

Account recovery (in the form of social recovery or otherwise) is a reliable way of securely restoring access to the Smart Account, which is not available for EOAs.

Each of those features can be enabled in a given Smart Account implementation even without modularity.

However, what if a user wants to add newly designed validation schemes after the implementation was deployed? What if she wants to deactivate or completely remove some of the functionality for her Smart Account?

One way would be to upgrade to another implementation. However, there could be no implementation in existence that satisfies all the user’s requirements at the same time.

The modular approach brings users a convenient way of switching out, adding, or removing validation schemes and other functionality in their Smart Account.

To dApp builders, modularity allows shipping highly customizable Smart Contract Wallets (Smart Accounts) to their users. It unlocks seamless UX, eases integration and saves time and effort spent on development.

This is what makes modularity so powerful!

Instead of a one-size-fit-all wallet or accounts experience, devs can now customise their smart account implementation to enable the perfect UX for every user and every use case!

Biconomy Smart Account Platform is Modular

Biconomy SCW v1 was strongly inspired by Safe SCW. So it was modular from the very beginning.

With AA, the txn/userOp handling flow changed significantly. Now, the validation and execution phases are separated, which allows for building modules that contain validation-only or execution-only logic.

First attempts to use Modules for userOps validation have been made in Biconomy SCW v1. In this approach, if calldata field of a given userOperation implies, that during an execution phase a call to the method, that is located in one of the enabled modules, should be made, the validation is done via this module as well. After experimenting with this approach, we realized the power of modularity for validating user operations and decided to make modularity an important concept in Biconomy SCW v2 architecture.

Biconomy SCW v2 (Biconomy Smart Account Platform) takes modularity to a new level, making validation modules the only party that is able to validate user operations.

validationmodules

Biconomy Smart Account Platform Modular Architecture

With this Smart Account Platform, we are releasing

  1. Smart Account implementation with modular architecture

  2. Tons of modules (& a framework to add more in the future)

  3. Improved Client SDK to access Smart Account Platform

Below, we’ll give a brief overview of the most important engineering decisions that have been made for the Biconomy Smart Account Platform & the supporting modular architecture.

Deploying a new Smart Account

Smart Account now doesn’t store ownership information in its own storage and has no default algorithm for validating signatures.

Thus it is ownerless by default.

To validate userOps it should have at least one validation module.

The Validation Module is a module that implements IAuthorizationModule interface. Implementing it allows a module to receive userOp data and return validation results back to the SmartAccount.

To ensure every Smart Account is able to validate userOps right after its deployment, the Biconomy Smart Accounts Factory contract configures and enables the first validation module at the time the new Smart Account is created.

Because of the requirements to use only Associated Storage during the validation phase set by ERC-4337, in most cases, the Module will return its own address as configured_module_address. However, if those requirements change it will be possible to build a ModuleFactory that deploys a new proxy instance of Module for every SA.

deploynewsa

Any Module can be enabled as a first validation module. It can be the ECDSA Ownership Module, which mimics the behavior of the EOA-owned Smart Contract Wallets we are all used to and validates userOps based on the signature issued by a privileged EOA.

However, it can be a Passkey Module, that expects a cp256r1-compliant signature.

It can also be a Session Key Module. Or any other module that allows ensuring userOp has been initiated by a trusted party or just meets certain conditions like recurring payments.

With this approach Biconomy Smart Account achieves ****the key goal of account abstraction: allow users to use smart contract wallets containing arbitrary verification logic instead of EOAs as their primary account and completely remove any need at all for users to also have EOAs.

Enabling Modules

Modules Management functionality is inherited by SmartAccount.sol from ModuleManager.sol. The former is in fact a modified version of Safe Module Manager, that has been adapted to the realities of AA. It follows the same way of storing data about enabled modules in a linked mapping. It means every next module enabled, links to the previous one.

The SENTINEL_MODULES with address 0x00…01 is used to mark the first and last items in the list.

0x00..01 ⇒ 0xa11ce

0xa11ce ⇒ 0xb0b

0xdeaf ⇒ 0xbeef

0xbeef ⇒ 0x00..01

Thus, the mapping is linked and it removes the need of having an additional array in case we want to iterate over enabled modules.

When a new module is enabled, it is added like this:

0x00..01 ⇒ 0xdecaf

0xdecaf ⇒ 0xa11ce

0xa11ce ⇒ 0xb0b

0xdeaf ⇒ 0xbeef

0xbeef ⇒ 0x00..01

Thus, Module Manager only stores information about whether a module is enabled or not.

There’s no categorization of modules, and also validation modules are not associated with specific execution functions.

It makes enabling a module easy and transparent.

Validation

At validation phase SmartAccount.validateUserOp is called by EntryPoint . EntryPoint expects validationData to be returned.

validationData is made up of validationResult, validUntil, and validAfter once all three values are packed together into oneuint256.

Since Smart Accounts have no default validation method, SmartAccount.validateUserOp needs information about what module should be used for this userOp validation.

This information is packed in the userOp.signature field. We append the moduleSignature with the Validation Module address.

SmartAccount.validateUserOp extracts this address from userOp.signature and verifies if this address is an enabled module or not.

moduleSignature is a signature that should be processed by a module and made according to the requirements specified by the module that is expected to be processing it.

useropvalidationflow

This approach is straightforward and flexible. It allows to have any amount of Validation Modules enabled. It also allows using any of them with any of the execution functions.

It is reliable as, despite the fact that any address can be appended by a malicious party to a signature as a module address, the validation flow will be forwarded only if this address is an enabled module.

This approach has a lot of upsides, however, downside is also present.

We will discuss it in the Hooks section of this article.

Execution

There are two default execution functions in SmartAccount.sol

executeCall(address dest, uint256 value, bytes func)

and executeBatchCall(address[] dest, uint256[] value, bytes[] func)

They allow for open-ended execution that is required for AA-flow.

Additional execution functions can be implemented in Modules.

Diagrams below illustrate various execution flows for Modular Smart Accounts.

aaexecutionflow

nonaaexecutionflow

Stateless Smart Accounts

A lot of discussion happened in AA community around storage patterns for Modular Smart Accounts.

We stick to the point, that purpose of Smart Accounts is to “store” and manage assets.Thus Modular Smart Account only needs its own storage to store information about modules.All operations made by SA should be managing the assets, and for this, there’s no need of using the SA’s storage.

Smart Account is something that can be used for years. With the upgradeability, that all the Smart Accounts feature, users can easily switch from one implementation to another to get new features, at the same time keeping the SA address unchanged. It is like you could change your Bank keeping your account number the same.

Logic is what makes Accounts smart. And it can easily be changed with the upgrade. The only source of potential upgrading issues is storage, which remains unchanged with every upgrade. The old storage layout can be incompatible with the new logic. That’s why to ensure seamless usage of a Smart Account in the future, it’s a good idea to keep its storage as clean as possible.

Biconomy Smart Account is almost stateless. There are two deprecated storage locations, that has been used in Biconomy SCW v1, but are not used anymore. The only active storage usage in v2 is the modules mapping in the Module Manager.

delegatecalls open endless possibilities to change Smart Account’s storage, that’s why we think that limiting them is a good idea.

Biconomy SA default execution functions mentioned above do not allow for delegatecalls.

The only place where delegatecalls are still present is execTransactionFromModule method. We kept it for consistency and compatibility with the Forward Flow in v2. We will be introducing an access control mechanism to further limit delegatecall usage by modules in the next versions. At this point, we encourage dapps and users to be very careful with enabling modules and signing txns that use delegatecalls.

To learn more about other approaches to Modularity, we recommend this article by Konrad Kopp. It contains extensive information regarding Modularity in the Account Abstraction. It compares various approaches to Modularity and provides links to additional materials on the topic.

Modules

Biconomy Smart Account Platform ships with a basic set of Modules that cover the most important use cases.

ECDSA Validation Module

It’s a basic Validation Module, that allows EOAs to become authorized to sign userOps for the given Smart Account. In fact, it works exactly like a regular ownership system, just rebuilt as a Validation Module.

ECDSA Validation Module follows ERC-4337 Associated Storage rules, by storing ownership information in a smartAccountAddress ⇒ EOAOwner mapping.

ECDSA Validation Module is easy to use with MPC providers like Web3Auth to abstract EOA Private Key storage and management out and unlock the Web2-like experience by logging in by email.

It is EIP-1271 compatible, allowing Smart Accounts to sign Ethereum messages for logging into dApps.

Passkey Authorization Module

Passkeys are a web2 concept to replace the normal username-password flow with passwordless web authentication. Most people use password-based sign-in and very less people opt for 2FA which makes it risky as it is the single point of failure. Using passkeys users only need to authenticate the device and the device will share a signature with the application which can authenticate the user.

The Passkey Validation Module is similar to ECDSA Validation Module but uses another cryptographic curve secp256r1 (instead of secp256k1 for ECDSA). In fact, both are using Elliptic Curves, however, traditionally it’s secp256k1 which is referred as ECDSA.

With passkeys, users can avoid having regular EOA at all. It effectively allows signing userOps with any passkeys’ compatible validation system, such as FaceId, etc.

Thus, developers can provide their users with Smart Accounts that have Passkeys (FaceId, Fingerprint etc.) as the only validation mechanism.

Session Key Authorization Module

Session Keys are a powerful concept of temporary user-issued cryptographic keys, that are authorized to sign only a predefined set of operations. Thus passkeys are safe to be shared with dApps and other users to perform allowed operations on the user’s behalf.

It opens endless opportunities for dApps to significantly improve UX. Session Keys can be used in Web3 gaming, DeFi, DeSoc, and other areas to bring a Web2-like experience to Web3 without compromising security and self-custody.

With this in mind, we designed the Biconomy Session Key system to be flexible, extensible, and reliable.

It features a Session Key Manager Module that performs general checks: is Session Key enabled and not expired? If everything is valid, it forwards the Session Validation flow to one of the Session Validation modules. Those modules contain use case-specific logic to check if the Session Key that signed the userOp is authorized to perform actions, specified in the userOp.calldata field.

sessionkeydataflow

Session Key Manager Module can be enabled by just calling SA.enableModule method. SA.setupAndEnableModule method can be used to enable one or more session keys along with enabling the Session Key Module.

Session Validation modules do not need to be enabled. Every active Session Key is added (by an authorized user) to the Session Key Manager along with rich data about this session key. This data includes the permissions and the address of a Session Validation Module that should handle session validation for this Session Key.

Module, which allows validation of the Session Key signed userOps can be the ultimate module for some dApps. However, every dApp has its requirements and use cases. It makes it non-trivial to build a one-for-all Session Keys Module.

The modular approach to Session Keys separates the management of Session Keys and Session validation logic. It allows the quick creation of Session Validation Modules for any specific use case without touching the core Session Key Management logic.

Session Keys allow users to enjoy seamless experiences in DeFi and Web3 Gaming. For example, the player can issue a Session Key that allows gaming backend signing operation with in-game currency for the next 24 hours on her behalf. So player doesn’t need to distract from the gaming process and approve every transaction.

The modular Session Key approach allows developers to easily build new or customize existing Session Validation Modules to let users issue Session Keys with a set of configuration options that are specific to their dApp.

You can read more about the Biconomy Modular Session Keys ecosystem and learn how to build your own Session Validation Module here.

Batch Session Router

Batch Session Router adds composability to the Session Keys ecosystem, allowing batching of several session key signed operations which should be validated by different Session Validation modules into one User Operation and execute them atomically.

You can read more about this module here.

Multichain Validation Module

It allows a dApp to require just one signature from their user to configure & deploy smart accounts on multiple chains and delegate certain actions with permission via session keys on all those chains.

The Biconomy Multichain Validator module significantly improves UX for deploying and setting up Smart Accounts on several chains.

It allows for a user to only sign once and authorize any amount of userOps with this signature.

You can read more about this module, how it works, and how it helps dApp improve UX here.

Account Recovery Module

Vitalik described the need for Social Recovery in this article more than two years ago. However, until recent times it was the choice of SCW developers whether to enable Account Recovery or not. For EOA, social recovery is not possible by its nature.

With Biconomy Modular Smart Account users can now choose whether they want to enable Account Recovery as a module or not.

The Account Recovery flow is the following:

User sets guardians and security delay when enabling Account Recovery Module When a user wants account recovery, the recovery request is built depending on the module that stores ownership info (ECDSA module or Passkey module etc.) The user informs guardians and they sign the Recovery Request. The Request is submitted to the Account Recovery Module smart contract (via userOp). If the security delay is set to 0, and all the signatures are valid, the request is executed immediately. If the delay is not 0, the request is recorded on-chain and will require another userOp (which can be sent by anyone as it doesn't even require any signature) to execute it after the delay has passed. This 2nd userOp won't be validated before the delay has passed. The design of the Biconomy Account Recovery Module is highly inspired by the above-mentioned Vitalik’s article.

Release

GitHub repository for Biconomy Smart Account Platform.

Biconomy Modular SDK with full support for the Biconomy Modular Smart Account will be released soon.

Audit

Biconomy Modular Smart Account has been audited by the Zellic and Kawach teams.

· 4 min read

Disclaimer: pre-requisites. The Batch Session Router module is a part of the Biconomy Modular Session Keys framework. So to get the full understanding of this doc it is recommended that you first study this doc. At least everything before the ‘Making a new Session Validation Module’ section.

What it enables

Those who are familiar with the Biconomy Modular Session Keys framework know that it provides great flexibility and allows for quick building of the Session Validation Modules for every new use case without touching the core Session Keys logic. Batched Session Router adds composability, allowing batching of several session key signed operations which should be validated by different Session Validation modules into one User Operation and execute them atomically.

UX Impact

This module allows batching several operations (actions) into one atomically executed User Operation, thus ensuring better UX for many DeFi use cases.

Let’s take a very simple example. Some dApp wants to allow users to perform a simple flow of actions:

  • Approve token A to a DEX
  • Swap token A for token B
  • Stake token B on some Protocol

It also doesn’t want to make this on behalf of the users when the rate of the swap is optimal.

In this case, they will use Session Keys to sign those operations. Since those actions are very common there already are the building blocks for this = appropriate Session Validation Modules (SVMs): ERC20ApprovalSVM, DEXSwapSVM, ProtocolERC20StakeSVM.

Each of those SVMs is only able to validate userOps which specifically performs a given action: swap, approve, or stake. So none of them is able to validate the userOp which leverages executeBatch() method to perform those 3 actions together.

Of course, we can always build 3 separate userOps for those 3 actions, however, they won’t be included in the same bundle as per ERC-4337 specification, so they end up on 3 different bundles, and that’s not what the user wants in DeFi.

It’s also possible to build a custom Session Validation Module that works with this specific flow and validates such atomic userOps which leverages executeBatch(). However, if in the future there’s a need to add one more step to this flow, this will require a new Session Validation Module to be built. Such an SVM would also double-use some of the code already implemented in the basic SVMs and that is not a good practice. Also, this would require permissions to be separately set up for every new SVM.

Session Router addresses those issues by parsing executeBatch() calldata and routing validation flow to the specific SVMs based on the actions into the batch.

Now, dApps can construct flows based on the actions validated by basic SVMs and share common permissions across flows.

How it works

Batched Session Router leverages SmartAccount.executeBatch() method to execute atomic operations.

It is a Validation module, that validates the userOps with the callData field containing a call to SmartAccount.executeBatch().

Every operation in the batch is expected to be an action managed by a specific Session Validation Module.

Of course, this action should be permitted for a given session key by enabling the appropriate session key + parameters in the Session Key Manager module.

sessionrouter

So, the Batched Session Router

  1. Verifies every action this userOp claims to perform is enabled for a given Smart Account.

  2. Checks which Session Key was used to sign the userOp.

  3. Checks this is the actual signer who is allowed to perform the actions.

  4. Parses the executeBatch() calldata to get the per-action calldatas and passes them to the appropriate Session Validation Module. SVMs perform permissions checks to ensure that actions that are about to be performed with this calldata comply with the permissions.

It also intersects validity timeframes for all the enabled sessions. if at least one session is expired or not due, the whole atomic operation fails to be validated.

Security assumptions

The Batched Session Router is stateless and does not perform (and require) any additional checks so no additional security assumptions on this side.

Conclusion

Batched Session Router allows validating userOps that leverage SmartAccount.executeBatch() method to execute several actions atomically, signed by a single Session Key.

Batched Session Router is an important addition to the Biconomy Session Keys framework which further improves UX and DevX and allows for great composability in addition to flexibility it already has.

· 7 min read

For the past couple months we have been working on modules that enhance the functionalities of Smart Accounts. The latest game changing release is multichain validation module!

It allows a dApp to require just one signature from their user to configure & deploy smart accounts on multiple chains AND delegate certain actions with permission via session keys on all those chains.

‍ For dApps & wallets that are active on multiple chains & roll-ups, this will drastically reduce the number of pop-ups for your users!

Let's diver deeper into what's multi-chain validation, why we need it, what it enables and the technical implementation!

Introduction

We already have too many chains to navigate web3. And with the imminent adoption of roll-ups and L2s, this isn’t going to stop. As Vitalik mentioned in his post on the three transitions happening in Web3 right now, users are going to exist on lots of L2s & roll-ups.

This is great for scalability and being ready for adoption!

But it’s not ideal for the user experience. It means having to create and maintain wallets on each network, bridging funds and tons of other friction points. Thus, it’s important for the Web3 infrastructure builders to ensure seamless cross-chain UX for their customers.

One of the solutions to the overall web3 UX problem, also emphasised by Vitalik as one of the three transitions, is moving from EOAs to Smart Accounts (or Smart Contract Wallets). Biconomy is at the forefront of this transition pioneering Modular Smart Accounts development.

Smart Accounts can solve a lot of the cross-chain UX problems. But one big pain point still remained - setting up these smart accounts on all the different networks. And the need for constant signature to validate actions on every network.

That’s something we at Biconomy have been working on for the last month with our partners at Rage.trade.

Biconomy's latest development in this area is the Multichain Validator module which significantly reduces user friction for multichain operations.

What it enables

Biconomy’s Multichain Validator module enables use cases which require several actions to be authorized for several chains with just one signature required from user.

Basically it enables Sign once, Execute on multiple chains use case.

This approach works best for actions which are same in nature but vary with some details from chain to chain.

Let’s take a real use case which inspired us to build such a module.

Let’s assume there is a dApp that helps users manage their crypto investments. It does it in a way, that when user comes to the platform, she allows dApp to perform some operations on her behalf. To make this happen, dApp deploys a new Smart Account for the user and enables Session Keys for this smart account. So user can issue Session Keys and give them to the dApp, so dApp can perform only user-selected operations: like only protocol A and for not more than amount X. Now imagine user wants to invest on several chains. There are various protocols on various chains, and user may want to set various permission for the sessions keys on various chains. Also, user doesn’t have a Smart Account yet, so dApp wants to deploy the SA for user, and enable session keys for it.

To ensure best UX, dApp wants user to sign as less times as possible. It means, that we need to protect userOps on several chains with various calldata with as less signatures as we can, ideally with just one.

However, userOps on several chains may have various nonces, various gas values, and of course various chainIds packed into userOpHash. Don’t forget about calldata which varies from chain to chain depending on the session key permissions for this chain.

With Biconomy Multichain Validator module it is possible to protect any amount of such userOps build for various chains with just one signature!

multichainvalidation

How it works

There is an efficient way to prove that a blob of data has been included in a list of trusted blobs without going over the entire list or even knowing the entire list. This is done using Merkle Trees.

How do we use Merkle Tree here?

  1. We take all the userOps which we need to sign.
  2. We get userOpHash’es from those userOps.
  3. Every userOpHash is now a leaf of a Merkle Tree.
  4. Instead of signing several userOpHash’es separately, user signs one Merkle Root.
  5. Now we can reliably prove on-chain that a userOp is a leaf of a tree whose root has been signed by an authorized user.

That’s exactly what we need. Now user can authorize any amount of userOps with just one signature over the Merkle Root of those userOps.

Every userOp is included into the leaf as userOpHash+validUntil+validAfter, so user can define various validity timeframes for userOps they want to authorize.

You can find the implementation of the Biconomy Multichain Validator module here. You may notice, that in theory, such an approach enables one signature experience not only for the several chains but generally for the several totally different userOps even on the same chain.

And this is true.

However, we expect this module to be less likely used in this way. It is because signing several userOps on the same chain involves knowing nonces for all the userOps in the Merkle tree in advance. Of course, it is easy to calculate those nonces by just incrementing. However, if even one userOp not from the tree will be created and processed between those from the tree, the userOp from the tree with the same nonce will become invalid.

So despite the fact that in theory this Validation module can be used as a general-purpose multi-userOp validator, it is most convenient and reliable to use it as a Multichain validator.

multichainflow

UX Impact

Biconomy Multichain Validator module significantly improves UX for deploying and setting up Smart Accounts on several chains.

It allows for a user to only sign once and authorize any amount of userOps with this signature.

It reduces user friction for dApps which for example want to quickly and seamlessly deploy and configure Smart Accounts on several chains or issue session keys with the permissions that vary from chain to chain.

More use cases with web2 like UX can be enabled with the described module.

It also allows for a very simple devX, as the concept of signing a Merkle Tree of userOps instead of signing userOpHash’es for several chains one by one is straightforward and not overengineered, so even developers who just start their journey in the web3 won’t be confused with what happens in the module and why

Security assumptions

Since user signs the Merkle tree root of userOps, there is trust needed to be placed into the dApp which creates this Merkle root. User should trust that dApp would not put the hash of a malicious userOp as one of the leaves. However even when user signs single userOp, she signs its hash, which is not human-readable. So the trust assumption is present even for the general ERC-4337 flow.

In both cases if user wants to verify what she is signing, it is required that she performs some operations on the original userOp(s) to check that what dApp proposes her to sign is actually the result of hashing an original userOp(s).

Thus the Multi userOp approach introduced by the described module does not introduce any additional security trade-offs compared to the vanilla ERC-4337 flow.

Conclusion

With the Multichain Validation module described above we start building the tools for the rollup-centric transition described by Vitalik. Even this simple module significantly improves UX for deploying and setting up Smart Accounts on several chains. It can be used not only with Biconomy Smart Account, but with any Smart Account which follows the EIP-6900 interface for validation modules. We’re looking forward to building more tools which enable the best multi-chain UX for the users of Biconomy-powered dApps.

· 16 min read

Motivation

Session Keys open endless opportunities for dApps to significantly improve UX. Session Keys can be used in Web3 gaming, DeFi, DeSoc, and other areas to bring a Web2-like experience to Web3 without compromising security and self-custody.

However, every dApp or at least every category of dApps has its own requirements regarding what permissions users should be able to configure for a Session Key.

For dApps that deal with ERC-20 tokens, it can be

  struct ERC20SessionKeyParams {
address token;
uint48 validUntil;
uint48 validAfter;
address receiver
uint256 maxAmountPerTransfer
}

For ERC-721 we would want to introduce an array of tokenIds that are allowed to be managed by this Session Key. In a more sophisticated case, we will want to specify a set of collection addresses and for every collection a set of tokenIds. In this case, the struct should have completely different fields.

Imagine, we have tens of such use cases (and it will end up like this since a lot of dApps can benefit from getting cryptographically secure temporary permissions to perform actions on behalf of users). It would be challenging to come up with a single contract that could efficiently identify which Session Key has which set of rules (permissions) and most importantly switch to the right algorithm to parse the data according to the required structure and check that a given userOp complies to this exact set rules.

sessionkeydataflow

The modular approach to Session Keys solves this issue. It separates Session Keys management and Session validation logic by moving validation of the params to separate smart contracts, called Session Validation Modules.

It allows for quick building of such Session Validation Modules for any specific use case without touching the core Session Key Management logic.

Session validation logic can be as complex as needed, since it is not now incorporated into one-fits-all Session Key Module, but lives in a separate module, that is triggered only when it is required.

How it works

Let’s go through the Biconomy Session Key Manager and ERC20 Session Validation modules line by line to see how it works.

We start with the Session Key Manager Module.

Session Key Manager Module stores the information about enabled Session Keys and performs basic checks that are common for all the Session Keys despite of the use case they are intended to serve.

contract SessionKeyManager is BaseAuthorizationModule

Session Key Manager inherits BaseAuthorizationModule which sets the proper interface in order for the Session Key Manager Module to be able to validate ERC-4337 userOps.


struct SessionStorage {
bytes32 merkleRoot;
}
...
mapping(address => SessionStorage) internal userSessions;

This mapping stores the information about which Session Keys are enabled for which Smart Account (the mapping address key). The mapping value is a SessionStorage object which is basically a root of a Merkle Tree containing the information about all the Session Keys that have been enabled for a given Smart Account along with the permissions.

Instead of a single bytes32 Merkle Root, we could have stored the nested address ⇒ SessionStorage mapping for every new session key. In this case, SessionStorage struct layout would have also changed.

The nested mapping approach is more straightforward, however, the Merkle Tree approach allows adding a new Session Key to consume less gas, as we always use the same 32 bytes warm slot instead of recording to a cold slot encoded by a mapping key.

As a trade-off Merkle Tree approach involves more off-chain work that needs to be done to re-calculate the Merkle Root for every new Session key to be added or existing to be removed.

The following getSessionKeys and setMerkleRoot methods are just respective getter and setter to access the userSessions mapping.

validateUserOp

This is the main method that does all the job, and allows Session Key Manager Module to validate ERC-4337 user operations.

This method is called from SmartAccount.sol when Smart Account identifies userOp that should be validated via the Session Keys module.

The method receives userOp and userOpHash, both initially provided by an EntryPoint.


SessionStorage storage sessionKeyStorage = _getSessionData(msg.sender);

This line is self-explanatory. We just create a pointer to the SessionStorage object for the msg.sender, which is the Smart Account.

All the additional information, that needs to be verified by Session Module Manager is packed into the userOp.signature field. So we need to extract it.

 (bytes memory moduleSignature, ) = abi.decode(
userOp.signature,
(bytes, address)
);

This block just extracts the signature, that is intended to be processed by a module, by dividing it from an address, that is a module address and is used in the SmartAccount.sol itself to forward the validation flow to the module. Check here for the reference.

The next block is more interesting

 (
uint48 validUntil,
uint48 validAfter,
address sessionValidationModule,
bytes memory sessionKeyData,
bytes32[] memory merkleProof,
bytes memory sessionKeySignature
) = abi.decode(
moduleSignature,
(uint48, uint48, address, bytes, bytes32[], bytes)
);

In this code, we parse the moduleSignature to get the module-specific data from it.

validUntil and validAfter are the standard values that identify the window where userOp is valid. Used like this, they will identify the validity period for a Session Key and we won’t need to write additional code to validate those parameters. It will be done in the EntryPoint, as described below.

sessionValidationModule is an address of a Session Validation module that should be used to perform some use case-specific checks.

sessionKeyData is the data that will be passed to the sessionValidationModule

merkleProof is the proof required to verify the fact that a SessionKey with the given parameters is actually part of a Merkle Tree represented by sessionKeyStorage.merkleRoot.

And finally, sessionKeySignature is a userOpHash signed by a Session Key.

The next block makes verifies the Session Key with the parameters is actually enabled.


bytes32 leaf = keccak256(
abi.encodePacked(
validUntil,
validAfter,
sessionValidationModule,
sessionKeyData
)
);
if (
!MerkleProof.verify(merkleProof, sessionKeyStorage.merkleRoot, leaf)
) {
revert("SessionNotApproved");
}

First, we construct a Merkle Tree leaf, that represents the Session Key (part of sessionKeyData and its parameters: validUntil, validAfter, sessionValidationModule, and the rest of sessionKeyData.

Then we verify this leaf is a part of a Merkle Tree represented by the sessionKeyStorage.merkleRoot. Read more about Merkle Trees and how they work in Solidity here.

If the leaf is not a part of the tree, it means that whether the Session Key or one of its parameters is wrong, i.e. has not been enabled by Smart Account authorized party (since there’s no owner as such for a Modular Smart Account, we use the ‘authorized party’ term).

If the leaf is part of the tree, we proceed.

return
_packValidationData(
//_packValidationData expects true if sig validation has failed, false otherwise
!ISessionValidationModule(sessionValidationModule)
.validateSessionUserOp(
userOp,
userOpHash,
sessionKeyData,
sessionKeySignature
),
validUntil,
validAfter
);

What is done first in this block, is that we apply ISessionValidationModule interface to the sessionValidationModule address and call validateSessionUserOp on it.

For our example, let’s use ERC20 Session Validation Module.

Let’s explore its validateSessionUserOp method, as it is being executed now.

SessionValidationModule.validateSessionUserOp

It accepts _op, which is basically the userOp, _userOpHash, _sessionKeyData , and _sessionKeySignature.

What is happening then, is that the Session Validation Module actually parses this use case-specific data from a _sessionKeyData. Each Session Validation module will have to make it in its own way as it operates with its own set of parameters.

address sessionKey = address(bytes20(_sessionKeyData[0:20]));

This by the way will most probably be common for all the Session Validation modules. Here, we extract the sessionKey identifier itself. In this case, it is a regular 160-bytes Ethereum address.

  address recipient = address(bytes20(_sessionKeyData[40:60]));
uint256 maxAmount = abi.decode(_sessionKeyData[60:92], (uint256));
{
address token = address(bytes20(_sessionKeyData[20:40]));

Here, we decode the main ERC20 Transfer parameters: recipient, maxAmount, and token.

We are sure that exactly those parameters have been set by a Smart Account authorized party for this sessionKey as we already verified that a leaf, composed of not signed data, is, in fact, a part of a Merkle Tree represented on-chain by a Merkle Root.

Now, we just verify if the _op.callData parameters correspond to the allowed parameters. If everything is ok, we proceed, if not, revert.

Since _op.callData is in fact a call to the token.transfer method encoded into the call to the SmartAccount.executeCall method, we need to parse all the parameters from the dynamic bytes array using those magic values. We know those values because we know the exact layout of a standard ERC-20 token transfer calldata.

That’s why we need Session Validation Modules. For the ERC-721 transfer, we would need completely other values to decode the calldata.

Now, if all the parameters are ok, and execution hasn’t reverted yet, we come to the signature verification itself. Since our sessionKey is just an address, we can use the standard ECDSA recovery algorithm.

Note, that we use standard EOA public key and private key pair in this example. However, the session key can be any key pair, for example, it can be secp256r1 Passkey pair. So the session key can be easily issued by your iOS or Android device.

And the validateSessionUserOp function returns the bool value, which represents the result of comparing the expected sessionKey with an address that in fact signed the userOpHash.

Now, let’s return to SessionKeyManager.validateUserOp method

validateUserOp again

If the Session Validation module returns true, that means, everything is right and what userOp tries to accomplish via its callData is allowed to be authorized with a Session Key, which was used to sign the userOpHash provided.

In this case, we have to pack 0 to the validationData, as 0 means signature validation has not failed.

If the Session Validation module returns false which means the signature provided is wrong, we need to pack SIG_VALIDATION_FAILED which is basically 1.

That’s we apply logical not operator (!) to the result that is returned from the Session Validation module.

So, we pack everything together with the validUntil and validAfter and return it to the EntryPoint, which will validate this validationData.

Congrats, you made it! That’s how sessionKey signed userOp validation happens.

Before proceeding to the next section, we also suggest checking the following test spec that showcases the usage of Session Keys modules in practice, including how this complex signature that contains a lot of additional parameters is built.

Making a new Session Validation Module

Now, let’s try to build a new (very simple) Session Validation module step by step.

Problem statement

Imagine, Bob contacted you and claimed he can sell your Bored Lady Penguins NFTs, so you can finally repay your mom. For this, all you need to do is to allow him to perform a setApprovalForAll operation on your NFTs.

However, you don’t trust him a lot, so you can’t transfer your precious NFTs to him, and there’s no other way of allowing him to do the approvals as if you perform setApprovalForAll setting Bob’s address as operator, he still won’t be able to re-approveForAll.

Luckily, you have not just an EOA, but a (very) Smart Account. All you need is to build a Session Validation module, that allows you to grant Bob temporary permission to setApprovalForAll for Bored Lady Penguins on behalf of your Smart Account.

Let’s buidl

First, let’s clone the ERC20SessionValidationModule.sol and rename it to ERC721ApprovalSessionValidationModule.sol and also change the contract name to ERC721ApprovalSessionValidationModule.

Let’s think, what use cases specific parameters do we need to encode into the _sessionKeyData.

We still need to encode sessionKey. Imagine, we decide to use a regular EOA address as our session key public identifier, so let’s use the first 20 bytes for it.

We need to encode the NFT contract address, so our session key only allows Bob to manage our Bored Lady Penguins, not our Punkzukis. Let’s use the next 20 bytes for it.

We don’t know which marketplace will be the approved party, as Bob keeps this in secret. So we can’t set the operator parameter. We neither need to set any tokenId here.

So, we only have two specific parameters, which is great for our demo use case.

Let’s create the flow for decoding those parameters and checking op.callData against them.

// decode parameters
address sessionKey = address(bytes20(_sessionKeyData[0:20]));
address nftContract = address(bytes20(_sessionKeyData[20:40]));

Bob will still use SmartAccount.executeCall to perform a call on behalf of our Smart Account.

So, we know how to decode _op.calldata.


(address tokenAddr, uint256 callValue, ) = abi.decode(
_op.callData[4:], // skip selector
(address, uint256, bytes)
);

Now let’s check that Bob tries to setApprovalForAll for our Bored Lady Penguins, not other NFTs.

We also don’t want him to send any value along with this call.

So we introduce the following checks:

if (tokenAddr != nftContract) {
revert("ERC721SV Wrong NFT contract");
}
if (callValue > 0) {
revert("ERC721SV Non Zero Value");
}

Then, let’s check it’s exactly setApprovalForAll function and that it sets true as approval status, as we don’t want to allow Bob to renounce our existing approvals.

For this, we need to parse the inner calldata, that will be used by executeCall when it will be called by an EntryPoint at the execution stage.

(bytes4 selector, bool approved) = _getApprovalForAllData(_op.callData[100:]);

...
function _getApprovalForAllData(bytes calldata _approvalForAllCalldata)
internal
view
returns (bytes4 selector, bool approved)
{
//first 32 bytes is the length of bytes array
selector = bytes4(_approvalForAllCalldata[32:36]);
//36:68 is the address of the operator
approved = (uint256(bytes32(_approvalForAllCalldata[68:100])) == 1);
}

Since we know, that setApprovalForAll has 2 arguments, we know that the bytes _approvalForAllCalldata consists of 32 bytes for storing the calldata length, then there are 4 bytes for the function selector, then 32 bytes for address, then 32 bytes for bool.

We get the required info from the calldata and return it.

Now, we can perform checks.

if (selector != bytes4(0xa22cb465)) {
revert("ERC721SV Not Approval For All");
}
if (!approved) {
revert("ERC721SV False value");
}

Where 0xa22cb465 is a setApprovalForAll selector.

And finally, we verify that the userOpHash was signed with the private key corresponding to the sessionKey and return the result, just like in the ERC20 case.

Check the full code for the module here.

That’s it. Now, let’s test how it works.

Test Case

Check the full test spec code here.

I will comment only code snippets that are specific to this tutorial.

Setup test environment

In the setupTests function we set up the test environment, which is common to all the test cases.

First, we need to deploy our ERC721 Approval Session Validation Module.

const erc721ApprovalSVM = await (await ethers.getContractFactory("ERC721ApprovalSessionValidationModule")).deploy();

Then we need to add a new Session Key to the Session Key Manager (it has already been deployed and enabled at this point).

const sessionKeyData = hexConcat([
hexZeroPad(sessionKey.address, 20),
hexZeroPad(mockNFT.address, 20),
]);

Here we fill our Session Validation module-specific data, which is only the sessionKey itself and our ERC-721 contract address.

const leafData = hexConcat([
hexZeroPad(ethers.utils.hexlify(0),6),
hexZeroPad(erc721ApprovalSVM.address,20),
sessionKeyData
]);

Then we add other Session Key parameters: validUntil and validAfter (we put 0 for them here), and the address of our Session Validation Module, so Session Key Manager knows who is responsible for making use case-specific checks.

const merkleTree = await enableNewTreeForSmartAccountViaEcdsa(
[ethers.utils.keccak256(leafData)],
sessionKeyManager,
userSA.address,
smartAccountOwner,
entryPoint,
ecdsaModule.address
);

Here we call a helper function enableNewTreeForSmartAccountViaEcdsa to add the leaf (session key and params) to the Merkle tree and upload the new Merkle root on-chain.

Now, let’s make the first test case.

Positive Test Case


const { entryPoint, userSA, sessionKeyManager, erc721ApprovalSVM, sessionKeyData, leafData, merkleTree, mockNFT } = await setupTests();

Here we get the test environment objects.

Then we call a helper function makeEcdsaSessionKeySignedUserOp that makes a proper userOp and signs it with a sessionKey.

But let’s check what this function does under the hood.

const txnDataAA1 = SmartAccount.interface.encodeFunctionData(
functionName,
functionParams
);

First, it makes a userOp.calldata with the parameters provided. In our case parameters are:

functionName = "executeCall";
functionParams = [
mockNFT.address,
0,
Erc721.interface.encodeFunctionData("setApprovalForAll", [charlie.address, true]),
]

So it means EntryPoint will call SmartAccount.executeCall, which will call mockNFT.setApprovalForAll.

Then we just fill the rest of the fields for a userOp and sign it with a sessionKey.

It gives us a correct signature over the userOp that does what we specified in the calldata.

However, we need to pack plenty of additional parameters into our signature.

Here’s how we do it.

const paddedSig = defaultAbiCoder.encode(
//validUntil, validAfter, sessionVerificationModule address, validationData, merkleProof, signature
["uint48", "uint48", "address", "bytes", "bytes32[]", "bytes"],
[
validUntil,
validAfter,
sessionValidationModuleAddress,
sessionKeyParamsData,
merkleProof,
userOp.signature
]
);

First, we pack all the session key parameters (general and specific) along with the signature.

This data is used by Session Key Manager and Session Validation modules.

const signatureWithModuleAddress = ethers.utils.defaultAbiCoder.encode(
["bytes", "address"],
[paddedSig, sessionKeyManagerAddress]
);
userOp.signature = signatureWithModuleAddress;

Then we append the Session Key Manager address to the signature, so Smart Account knows which Finally we put the new signature back into the userOp.

And return the userOp.

So, let’s get back to our test case.

Now we have a userOp with all the required parameters packed inside it.

Then we just make sure our operator charlie hasn’t been approved before.

Then we ask EntryPoint to handle the userOp for us.

Then we check that indeed charlie is an approved operator for our NFTs right now.

Let’s run the test!

sessiontest

Yay, it is passing. Mom will be proud of you!

Check one negative test case on GitHub.

As homework, you can build more negative test cases for this Session Validation Module.

Or you can even build your very own Session Validation Module! Check the next section for more details.

Opportunities

Opportunities are endless with Modular Session Keys.

More complex Session Validation Modules can be introduced to handle popular use cases.

For example, a Web3 Gaming Session Validation module can allow specifying several erc-20, erc721, and erc1155 tokens that combined together present the entire set of assets used in a given game.

Swap Session Validation Module can only allow for swaps at a specified rate. Since every swap calldata contains a minimal amount to receive or a maximum amount to send as a parameter due to the slippage, we can use this parameter to calculate the minimal efficient rate for the swap that will be allowed to be used for a swap signed with a given Session Key.

Any kind of automation can be handled via Session Keys as well. Current automation solutions have a low potential for customization and extensibility. With Session Keys, it is possible to delegate only the selected operations to be performed by the automation service on your Smart Account's behalf.

Conclusion

In this article, we discussed how the Modular approach to Session Keys allows for quickly enabling efficient solutions for custom use cases in Web3, decomposed how userOp validation happens through the Biconomy Session Key Module, and went through a step-by-step guide to creating a new custom Session Validation Module.